Showing posts with label Security. Show all posts

Mobile Hacking Part 1: Introduction and Device Building

Welcome back everyone! Today we start a brand new series about mobile hacking. This article will be an introduction to the concepts we’ll cover throughout the series, and a tutorial on how to build our own mobile hacking device. So, without further adieu, let’s get started!

Introduction and Overview

Smartphones are everywhere. Most people carry one with them majority of the time. Imagine if we could turn a cell phone into an advanced hacking machine, capable of launching targeted attacks. We’d be immensely powerful in the world of mobile devices. Being able to hack from a mobile devices comes with insanely valuable advantages. Throughout this series we’ll be learning to use these advantages in order to further enhance our hacking abilities.
Now that we have a premise for this material, we need to explain what we’ll be covering in this series. In order to avoid divulging too much information about the upcoming articles (no spoilers!), I’ll give a general overview instead of a specific timeline.
  • The advantages and disadvantages of mobile hacking
  • The different options in mobile hacking equipment and setups
    • Also including the pros and cons of each set
  • Mobile specific hacks
    • Hacks that can easily/only be performed on a mobile platform
  • Mobile v.s. Mobile
    • Hacking mobile devices with mobile devices
  • Additional (optional) mobile equipment for specialized attacks
It may not seem like a lot, but trust me, these topics will seriously help us grow and develop as hackers.

Building our First Mobile Hacking Device

Now that we have a basic overview of what we’ll cover throughout this series, we can move on to building our own hacking device! We’ll start by explaining the tech behind the device we’re going to make, and then we’ll get right into it.
It’s time to introduce a company that made the technology we’ll be using today, Pwnie Express. Pwnie Express makes a variety of hacking devices available for purchase. Among these devices is the Pwn Phone. Normally you’d have pay a little over $1000 for a Pwn Phone. But for those with enough ambition, the Pwnie Express maintains the AOPP (Android Open Pwn Project), which allows us to build our very own Pwn Phone! Just a heads up; the AOPP only supports a handful of devices, before continuing, I recommend you make sure your device is supported!
Now that we know where this technology is coming from, we can get building. We’ll be building our Pwn Phone out of a LG Nexus 5, running completely stock ware. So, let’s get started!

Step 1: Download Needed Files

In order to start making our pwn phone, we need to download a handful of files. Since we here at Hacking Loops care about you, I’ve made a simple BASH script to do all the downloading for us. We need to download this script, format it, and make it executable. Let’s do all that now:
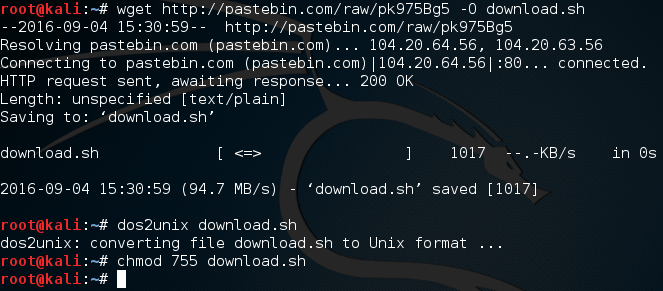
downloading-download-script
Now that we have this download script, all we need to do is execute it and wait. These files are quite big, so you’ll need to have some patience. It will store all the downloaded files in a new directory named project. So, let’s execute this script and wait:
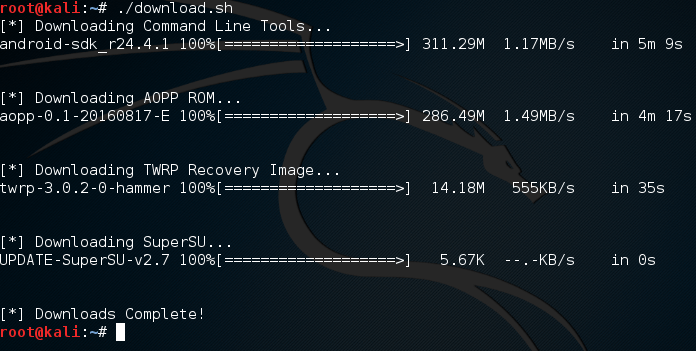
executing-download-script
Now that we have these files, we need to do some work with them before we continue.

Step 2: Unpack the Android Command Line Tools

In order to work with our Nexus, we need to use the Android SDK platform tools. In order to use these tools, we need to unzip the Android file we downloaded in the project directory:
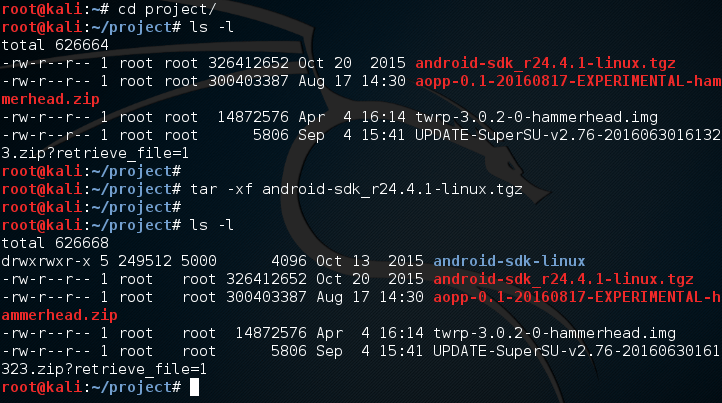
unzipping-SDK-tools
Here we use the tar command in order to extract the Android SDK zip archive into a new directory name android-sdk-linux. Inside of this new directory is an install tool that we need to use in order to install the proper platform tools. Let’s move into this directory and use the update tool:

executing-google-install
By using these settings with this install tool, we can install just the platform tools, not any of the other software that would be installed by default. Once we execute this command, we will receive a LOT of output. Eventually we’ll be given a prompt asking if we accept, answer yes and we can continue:
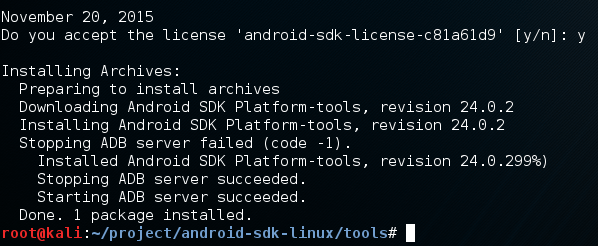
finishing-install
Now that we’ve finished the install, a new directory can be found one directory up named platform-tools. We need to add this directory to our PATH so we can use the tools from anywhere, which will make our job way easier:

editing-PATH
Now that we’ve added this to our PATH, we need to do some work on our device before we can continue.

Step 3: Enable USB Debugging

Before we can continue, we need to enable USB debugging on our device so we can modify it from our Kali system. In order to enable USB debugging, we first go to ‘Settings’, and scroll all the way down to ‘About phone’:
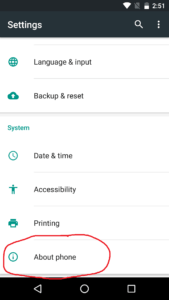
about_phone_normal(1)
Inside of this option we see a large amount of information about our device. Near the bottom of the menu, we can see a tab labeled ‘Build Number’:
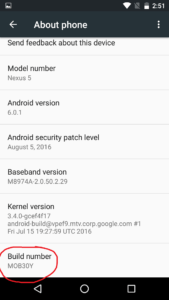
build_number(2)
If we keep tapping the build number option, we will unlock developer options for our device. Once it happens we will be given a notification:
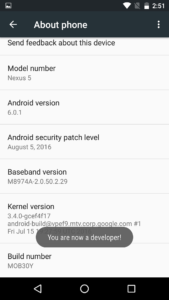
dev_options_unlock(3)
Now that we’ve been given this notification, we can go back to the main settings menu and see a new option:
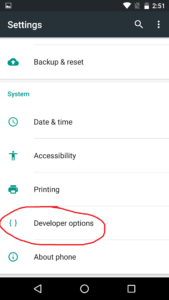
new_menu_ops(4)
Developer options allows us more power over our device, including the ability to enable USB debugging. Around the middle of the menu we can find the option to enable it. Once we do, we will see a prompt asking for us to confirm our decision:
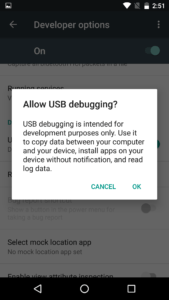
allow_USB_debug(5)
There we go. Now that we have USB debugging enabled, we can continue.

Step 3: Unlock the Bootloader and Install TWRP Custom Recovery

In order to install the AOPP, we need to install it through a custom recovery. If we’re going to use a custom recovery, we ought to install one first! We’re going to be install the Team Win Recovery Project (TWRP for short). This will allow us to backup and install software on our device easily.
But, there’s a catch. In order to install TWRP, we need to unlock the bootloader.  This is incredibly easy so let’s just get it out of the way.  Inside of the compressed file that we setup earlier is a tool named fastboot. This tool allows us to interact with the device while it’s in the fastboot state. In order to access the fastboot menu, power down your device, then hold the power and volume down buttons at the same time until a menu with an open android appears.
Now that we have the fastboot menu open, we need to make sure our Kali system is recognizing the phone. We can tell fastboot to list all the devices current connected. Once we do that we’re going to use fastboot to unlock the bootloader so we can install TWRP. Let’s do these things now:
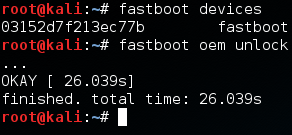
fastboot-list-and-unlock
Now that we have the bootloader unlocked, we can flash the TWRP recovery image to our device. We also use fastboot for this, and the process is rather simple. Let’s flash TWRP now:
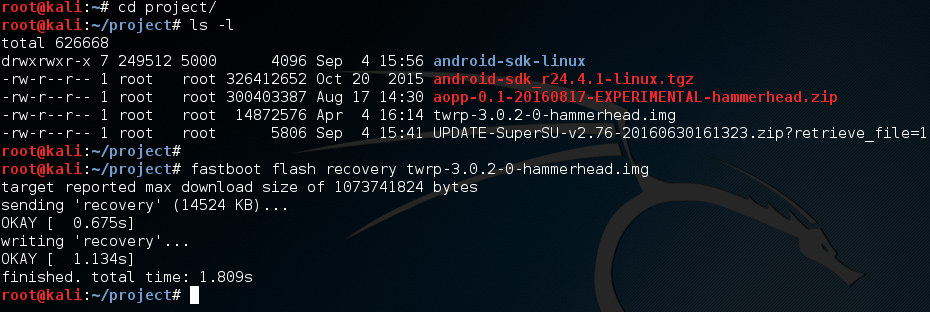
flashing-TWRP

Now that we’ve installed a custom recovery, we can continue.

Step 4: Install the AOPP ROM

Now that we can use our custom recovery, we can install the AOPP. In order to boot into our recovery, we need to select the “Recovery” option from our fastboot menu on our device. You can scroll through the options by using the up and down volume buttons, and choose the selected option with the power button.
We should see the boot screen for TWRP, once it loads it should look something like this:
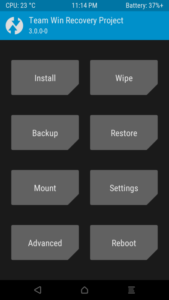
twrp menu
Now that we’re in TWRP, we need to do some wiping. To do this, we need to select the “Wipe” option, and select everything except Internal Storage and then swipe the bar at the bottom of the menu. After a few seconds, the wipe should be successful.
Now that we have wiped our system, we need to move the AOPP file over from our Kali system to our device. We can do this using a tool known as android debugging bridge (adb). We need to stay in recovery mode to use adb, so let’s use adb to see if the device is ready. If it is, we’ll push the zip file from our Kali over to the device:

push-AOPP-zip
Now that we’ve pushed the AOPP zip file to the device, we need to go back to the main TWRP menu. From here we select the “Install” option. Once we select this option we should see a space that lists file names. Among these names should be the AOPP that we pushed to the device. Select this file and follow the confirmation prompts to flash it to the device.
Alright, we’re almost done installing AOPP. There’s only one more thing we need to do. We need to push the  SuperSU zip file to the device, let’s get that out of the way:

pushing-SuperSU-zip
Now that we have all this in place, we should be able to reboot our device. Only one more step to go until have a fully functional pwn phone!

Step 5: Setup the Pwn Phone Environment

This final step is very easy. All we have to do is boot into our new system and follow the setup prompts. Once this is complete, we will be greeted with the pwn phone home screen. But you may notice something, we don’t have any tools yet!
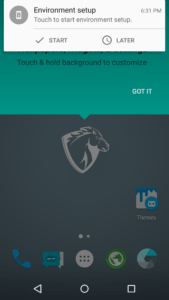
In order to get the tools we need, we need to setup the Pwnix environment. There should be a notification at the top of the screen prompting us for to setup the environment:
env_setup
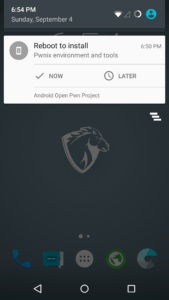
Once we select start, we will be prompted by SuperSU asking us if we want to allow the Pwnix setup root access. Once we grant it root permission, the setup will begin. Once the setup is complete, we’ll be prompted to restart to finish the install:
reboottoinstall
Once we restart we should have quite a few tools ready for use. But if we want to greatly expand the amount of tools on our device, we need to perform an update. We should have an update prompt at the top of the screen in the same place the setup prompt was. Once we perform this update we should have a fully fledged pwn phone!

There we have it! We successfully built our very own pwn phone. This device is incredibly powerful and I intend to prove it. In the next article we’ll be going deeper into the advantages of mobile hacking. I’ll see you there!
Share:

How to Restrict Virus or Trojan Attacks

Most of you are already aware of basic ways to protect your system from becoming infected. For the knowledge of new users,we will try to cover almost all techniques through which viruses infect your system and then methods to protect your system against these attacks.
stop virus attack, prevent from trojans
Prevent PC or Laptops from Viruses or Trojans
If you want to know if your system is infected by either viruses and trojans then there are certain techniques, symptoms, and guidelines which will help you identify the problems. Similar to the human body being infected with a virus, a computer will also demonstrate symptoms to tell you that something is wrong. Here are some symptoms of a computer virus:
1. Your computer might be running slower than normal (decreased efficiency means slow processing, sometimes system lags, etc.).
2. Some programs might open without your permission.
3. System start up takes too much time to boot.
4. Various error messages appear on the screen when you open something.
5. System registry or task manager has been disabled or folder options is missing.
6. The most important: antivirus shows messages of detecting viruses, or in some cases unable to update antivirus, or sometimes not even able to install any new antivirus or security software.
7. While scanning your system with antivirus or anti spyware tool, it shows viruses but they’re not deleting.
Have you ever tried to understand how your system gets infected? What has infected your system? Is it because of your friend? A USB? Or maybe your online activity somehow resulted in infection of your PC or laptop? Today I will share each and every thing that can infect your system and how you can fix your PC or laptop if it’s already infected.
Did a system got infected because of your negligence or lack of awareness?
1. Using Cracked Versions of software, especially security ones like antivirus and anti-spyware
This is the primary cause of infection on a device. Hackers know that users often look for cracked versions, and are willing to exploit that. If we attach a trojan or a virus, and you receive an alert but you ignore, then you have not gotten rid of the trojan.
NOTE: If your antivirus doesn’t show any keygen or crack as a virus DON’T ASSUME THAT IT’S NOT A VIRUS. Most likely it’s a more advanced virus and you have been infiltrated. Please do not use cracked software.
2. Pen drive or USB drive :
The next biggest cause of infection to your system is USB and external hard disks.
Now how a virus enters into your system using USB drives. You have connected your USB drive to your friend’s computer and by chance your friend’s system is infected by a virus or Trojan, one with the property to replicate itself using memory. You take your USB back, plug it into your computer, and now your system is infected as well. If you are using good antivirus software, your antivirus will send you warning and alert messages – don’t ignore those.
3. Downloading things from unknown sites:
Users frequently search for files over the internet to download. Hackers know that certain icons have huge followings, and often they will bind malicious codes to files so that when users download wallpapers or other files to their system, the virus comes with it.
Now after discussing these things, you know your system was infected through negligence. It’s time for you to learn how to protect and defend your system from viruses and trojans.
HOW TO STOP VIRUS OR TROJANS 
1. Using A Good Antivirus:
There is a common misconception that the best anti-virus softwares require payment. This is one of the reasons that people go for cracked software. Here is one of the best free anti-virus softwares I have ever found.
Best Free Antivirus : Avira Personal Antivirus i.e Antivir. Avira is still the best free antivirus available on the internet because of its expert configuration ability.
You can download avira for free from:
http://www.filehippo.com/download_antivir/
After downloading the antivirus, you need to make it as good as a paid antivirus.
a. Install the antivirus and update it. Note updating antiviruses regularly is compulsory. Don’t worry, it will update itself automatically whenever an update is available.
b. After installation, at the top right-hand corner you will see a “CONFIGURATION” button. Just click on it and a new window will pop up.
c. At the top left-hand corner you will see a click box. Click on that. Now you will see several things in it.
1. Click on “Scanner.” Click on all files and set the “Scanner Priority” to high and click apply.
2. Click on “Guard” and click on all files and click on “Scan while reading and writing” and then click apply.
3. Click on “General” and click on select all and then apply. In “General,” tab to the WMI section and click on advanced process protection and then click apply.
4. After doing that, restart your PC.
Now you have made your free antivirus equivalent to a paid one.
Best Free Anti-Spyware: Spyware Terminator with crawler web security toolbar.
Download it for free :
Install spyware terminator with web security tool bar. Now the following problems are solved:
1. No Trojan can attack you.
2. Protection from malicious websites.
2. Solution for cracked versions of software:
As I mentioned earlier, never download cracks and keygens directly to your system. Several other methods are available. First, try to search for a Serial Key. If you didn’t find one then follow the next steps.
Before downloading any Crack and Keygen, go to the Website:
;
Now copy the download link of the Keygen or crack in the URL box provided on the website. This website contains all the world famous antiviruses and will scan files for you.
3. Pen drive or USB drive solution:
For windows 7, read my last article:
For windows XP, follow these steps:
How you can protect your system from being infected from the pen drive. Do the following three things, the rest is being cared for by your antivirus.
1. Turn off Auto Play Devices:
To do it, go to Start Menu–> RUN–>type gpedit.msc and press enter–>User Configuration–>Administrative templates–>System–>Turn off Autoplay–> click on enable and then select all drives.
2. Turn off Computer Browser service:
To do it go to Start Menu–> RUN–>type services.msc and press enter–>then Find Computer Browser service, disable it and then restart your system.
3. Most importantly, always scan pen drives or external hard drives after connecting them.
The best alternative is to use Linux, as there is no autorun or autoplay concept in Linux operating system.
4.Downloading Stuff from Unknown Sites Solution:
The solution of this problem is already provided. The web browser security toolbar will help you while surf only secured and genuine websites.
For Hackers
1. Use Deep Freeze on C drive: Always use deep freeze for testing hack tools. After the next restart, your system will be in same position it was previously, so this is a safe place to test tools.
2. Install Virtual Box, and over virtual box install another windows and test all hack tools using virtual windows. This will protect your system from being infected. It will also give you more knowledge about handling the viruses and other situations.
3. Use Sandbox browser to test run the downloaded files.
4. Create two to three fake email IDs and use them for testing Keyloggers and other fake email hacking software.
Share:

Delete or Unlock blocked files using free tool Lock Hunter

Lock hunter is a freeware software.This helps you to unlock blocked files and even delete blocked files which gives you delete error.It even helps renaming or even copying the blocked file.
Lock hunter displays the process on how it carries out a lock on a file or a folder.
It even shows how to unlock,rename ,copy or delete a locked files and allows to remove locking processes from hard drive,deletes the files to the recycle bin so we can even restore them if it was deleted by any kind of mistake.It supports both 32 and 64 bit windows operating systems.
If you ever have installed a file and you cannot delete or stop it from running then you can give this free tool a try.You can try this tool to find and also that delete running file completely.
By Running the Lock hunter program opens this screen:

So if you have unwanted programs running on  background we can use Lock Hunter.Download LockHunter
Share:

Top 10 Computer Viruses of all Time

The Internet has been a revolutionary technology that changed the world and the hackers have been trying to crack the vulnerabilities that they can use for their own gains. They also pose a threat to the internet.Here are the top 10 viruses and worms that impacted the world.

1. Melissa
Davil L Smith in 1999 created a virus called Melissa based on Microsoft Word Macro.The virus propagated through the email messages with a attachment called ”Here is that document you asked for, don’t show it to anybody else.”When the victim clicks the attachment, the virus replicates itself by sending it to top 50 emails on the contact list.

2. ILOVEYOU
Developed in Philippines it propagated through Internet Relay Chat and by emails in a Visual Basic Script attachment by tricking them to believe the email is from a secret admirer.It hid several copies of the file in victims computer and replaced several files in the Hard disk of itself.It downloaded a virus file Win-BugsFix.Exe from the internet and executed it.The file would then email the passwords to the Hackers email address.The worm accounted for over 10 billion in damages.

3.  Code Red & Code Red II
Found in 2000, Created a backdoor in the victims computer and used it to control remote access to carry of various kinds of attacks including Denial of Service using the victims computer. The virus used a vulnerability in Windows 2000 and Windows NT , where the buffer overwrites the adjacent memory if the buffer overflows due to too much information.

4. The KLEZ
The Klez debuted in late 2000 , lasted fo several months and spread using spoofed emails to the contact list in the victims computer.It could either act as a Trojan Horse,virus or a worm.The virus made the operaating system inoperable or sometimes could even stop a antivirus program.
5. Nimda
Nimda, Admin spelled backwards, found in 2001 the virus spread rapidly and attacked major internet servers and created backdoors in the victims computer for Denial of Service Attacks.It spread through various methods including emails and gained similar level of access as the person logged into the computer, i e as a administrator or limited user.It bought down many network services by taking up and depleting its resources.
6. SQL slammer/Sapphire
Found in January 2003, the Virus bought down several major web services including Bank Of America ATM services and Continental Airlines and caused more than 1 billion in losses.It spread rapidly doubling every few seconds and infecting half of internet backbone servers in fifteen minutes before the antivirus software’s caught it.
7. MyDoom
Created in 2004 , created a backdoor in victims computer and spread through spoofed emails and peer to peer networks. MyDoom had 2 triggers , where one trigger command was used to command it to Denial of Service attack and the second trigger was used to command stop distribution of the virus.
8. Sasser and Netsky 
Created by  a 17-year-old German named Sven Jaschan , though both programs behaved in different ways, the similarity in coding led in finding out the person. Sasser virus attacked a windows vulnerability and propagated by attacking the victim computer and scanning potential IP addresses for other vulnarable computers for downloading the virus. It even made the victim’s computer difficult in shutting down their computer.   Netsky moves through email’s and windows networks through a attachment and causes a Denial of service attack in taking down web services.
9. Leap-A
Malicious program designed specifically for attacking vulnerability in Mac. Found in 2006, it uses the iChat program to send out messages to all the contacts in the contact list and propagating further to other vulnerable Mac computers. The virus sends out a corrupted file which looks like a jpeg image file attached through the iChat application.

10. Storm Worm
Storm Worm is a Trojan horse program.Found in the year 2006 and called with different names,storm worm is used to carry different payloads of programs in it.This was also used to create Botnets which is used for remote control of the victims computer for sending out spam mails.It was found that more than 200 million emails were infected in carrying the Storm Worm virus in  a span of few days.The Worm was downloaded off the links disguised of the recent events taking place at the time, like the Beijing Olympics or Earthquake in China.
Share:

How people try to Cheat Google Adsense

Google adsense is the most profitable  revenue stream for publishers and also a reliable advertiser for its advertisers, but some people may try to earn more money by fraud clicks or many other ways that are mentioned here to finally get their  accounts banned. The post may sound good for people who came in searching for cheating tricks , but if you try these methods, you will surely end up banning your adsense account.So here are the tricks that you should not be doing just to earn some quick bucks..

google adsense


1 Clicking your own Ads
This is the most dumbest method and is mainly used by  noobs who don’t understand web technology and the internet . These fraud clicks may range from few clicks to even hundreds of clicks, just to make money faster. But the end result is no mystery.
2 Click through rate manipulation
Click Through Rate(CTR) of a page is usually considered to be 7% or less on an average.If there are more fraud clicks on your site, resulting in CTR of more than 10%, will surely raise Google’s flag. So some people try to adjust the click through rate by displaying the ads in junk low keyword density pages generating high traffic visits onto those pages. This then lowers the CTR below 10% and they even use the low CPC ads on those junk pages.
3 Fool the Visitors
When the site Admin puts the ads on the section of  ‘Sponsors’ or any other boxes with weird messages like ‘Support Us’ or ‘Click Here’, will raise flags to Google about these high clicked and low  value Ads and get their Account Banned soon enough.Only box title’s mentioned in the Google Adsense TOS policy can be used. So let your Ads look like Ads and don’t try to fool the visitors.
4 No Content , Only Ads in Page
If you insert all Adsense codes on a single page without content, then the user has no choice but to click on the Ads expecting to see some results or information that he came for, but this will lead to more Ad clicks which are closed instantly after the user discovers it as an Ad.So the Google has to protect its Advertisers and provide the value for what they are paying to Google.So google has no other choice but to terminate your account.
5 Ask Friends Or Family to Click your Ads
Here is another trick that’s used by noobs.  The Blogger might ask his friends living far off or abroad to click through his ads. But Google has enough Data from search engines or your profile across the internet to know how the clicks are generated and how that IP is related to your Address and find out if you have any friends or family in that place.So stop asking your relatives or friends to click your ads just because they live in far places.Multiple clicks from that friends IP location will get your Adsense account Banned.
6 The Popular Click Ring Network Cheat
The bloggers organize ring networks using the forums and social networking sites and plan the fraud clicks ,among their mutual website ads and click through each others ads.Once google finds out about this trick, you are sure to get banned from the program.
7 Proxy to Click Ads
Another popular trick among the publishers, for which they use proxy websites like the tor “onion routers” or any other anonymizer to click on their ads on their website.This trick is well known and might land your adsense account into big trouble.
8 Paid Ad Click Cheat
Paid Click Cheaters are often available for around $50 and mainly are people employed from developing countries like China,Phillipines,India or Pakistan. This lets the owner of the site to earn some money until his account gets banned from Google Adsense.
9 Automated Software ClickBots for Advertisements
The ClickBots are smart programs written in order to generate good CTR by browsing multiple pages on the site and then clicking on the ads, and stay for a few minutes to avoid suspicion. Some ClickBots even change their IP address , so that the Ads appear Genuine to Google.
10 Multiple Computers Click Fraud
This user Doesn’t have much knowledge about IP address or internet technology for that instance.The person tries to click on the ads from multiple computers from home ,Internet Centers, or any other internet spots.
Disclaimer: These methods mentioned here are solely to warn you about the consequences of your account getting banned if you try any of these methods listed here.And i do not recommend you to try any of these unethical tricks and even i don’t use these tricks myself. So this post is mainly to help you be aware of the reasons for Google adsense accounts getting banned and help you to prevent your account from getting banned …CHEERS..!!
Share:

How to Hide any file inside a Photo or any Image File

Hiding files inside an image file was never easy with all the nuisance encrypting and password protection by a software just to hide a file.But here is a simple trick to demonstrate how to hide any kind of file like .Exe or .flv or .txt inside a image file.
The art of hiding any file inside an image is called steganography and you can refer this link for more details.The trick uses a JPEG image file to store a any kind of file in it.So follow up these simple steps to hide a file inside the image..


Step 1 :
Get an JPEG image file and a txt file for this trick as in the screenshot, here i have used a text file and a JPG format file PS: Thats my cat with ma cellphone :P

Step 2 : Now select the files/files you want to hide and compress them in a ZIP or a RAR archive to get a compressed File.

Step 3 : Now open up your command prompt by going to Start->Run->Type ‘Cmd’ and Hit Enter. You will see the command prompt current folder set to Documents Directory. Now change to root directory C:\ by typing “cd \” where your files are located.
Step 4 : Now what you will need to do is combine both te image and RAR file to create a new image file that will look he same. Type in copy /b SAM_0573.JPG+FileToHide.rar NewImage.JPG in the command prompt and it will create a new image file of same format with the RAR file inside it.Here is the screenshot

Now you will notice that the image file size has increased as a result of the copied file inside it.
Now just compressing the file inside the image wont do, we need to get the file back.So the simple trick is to Open the Image file with WinRAR using Open With..
An alternate way to open the image file to get the file is to change the extension of the image file from .JPG to .RAR and open it as a compressed file.
Well there you have it, this is a simple trick to hide your files in an image and you can even use this trick to brag with your friends and show off your geeky side. Leave your comments or suggestions that you would like to share with us…Cheers.!!..:D..
Share:

Use Multiple Passwords for different Websites using a Single Master Password

Its a fact that majority of the web users tend to sign up and register in various websites and use the same passwords on them because its easier to remember.Well recent attacks on popular websites proved that this idea might be dangerous as hackers who gain data of any weak security website database  will try to use it for multiple accounts like paypal, using that  email address and  password, and most of the times find the passwords similar for these  accounts.


This is a terrible mistake as many people become victim of theft or malicious actions and this  will lead to creating a chain reaction of  the persons accounts getting hacked across various websites he had registered. So to prevent these kinds of attacks, its advisable to use different password for every different account, but this makes it harder to remember each password.
Solution –> So here is a firefox addon called Password Hasher which will generate random passwords for each website sign up using a master password. This addon has the following features
  • Easy to remember single master password for multiple passwords on different websites.
  • Change passwords using the site tag immediately.
  • Easy to change master key password without effecting other websites.
  • Generate passwords automatically.
  • Choice to select password length and type of passwords including case and digits.
So as its specified, its even provides the option for the generated password length and also prompts the usage of case and digits in the password to be generated.
To see the passwords on the browsers where the plugin is not available, it even generates a portable page as of to be able to carry the passwords with you all the time without the support of the addon.
Source :FirefoxMastery
Share:

How to identify and stay safe from phishing scams

Phishing is a type of social engineering form of hacking a persons private data like passwords or credit card details or any other private data by faking the identity of any legitimate trustworthy company or individual.Phishing is a basic form of hacking,to steal any sensitive data and due to the less complexity involved in carrying out this hack, it is one of the most widely used method of stealing ones sensitive data. Hence this kind of attack is mainly carried out by noobs who try to steal any sensitive data and the people who are  less conscious about these kinds of  scam usually fall as a victim.

So it is well advised to properly know the kind of  phishing tricks used by these hackers in order to avoid it and hence stay safe.So here we try to create awareness about the phishing techniques used by the hackers and also educate you on how to stay safe from these kinds of security risks.
  • Use a good email filter ,antivirus software and anti spyware to stay away from any phishing scams.Its advisable to use a internet browser that has phishing filters in it. eg:Firefox,chrome,Internet Explorer or Opera.
  • Avoid mails or any links that say you have won some fabulous prizes or a lottery of any kind.These are mainly phishing scams.
  • Visit the site by going through the address bar ,rather clicking on any shortcut link from untrusted websites.
  • Check the site name when visiting a site.It may have the same design logo and interface as a genuine site but the site name may contain names with slight alterations,like in case of paypal.com..it may be papyal.com or paypal-verification.com etc
  • The highest probability of phishing attacks are carried out through email’s.So be careful about the mails in your inbox that ask for your sensitive data.
  • Use popular email services like Gmail or YahooMail that offer the best spam filters from any kind of  spam or phishing emails.
  • Report any Phishing attack or any Spam as soon as possible to spam@uce.gov reportphishing@antiphishing.org ,so that the spam is contained as soon as possible and doesn’t spread across the internet.
  • Check any website that don’t use https:// while gathering sensitive data. If it is not in https:// then double check if the site is legitimate or not.
Well these points will help you stay safe on the internet and prevent you from any type of phishing attacks that harm you in any way.
If you would like to share any tip with us, then let us know by your comments.And keep visiting back for more interesting and useful topics ..Cheers,,:)
Share:

Change IP address instantly for free While Browsing

You may need to change your IP address while surfing the internet for anonymity from search engines storing your data or to access any specific location based service.  Of course you have a lot of tools offering these features like this, as the most popular anonymizer tool  tor.But the problem with that is it takes too much time to start up or it needs to be installed first to use it. But here is a free online tools that lets you change your IP address on the fly..


Here is a screenshot of the website, shows the multiple IP addresses to choose from and some may be free while others require to be purchased.
On clicking on any one of the IP addresses , it will take you to the next screen where it will display a sub address bar to your browser, which when you enter the url will redirect your request to the new IP address.
So there you go, an easy and a quick way to change your IP address on the go, without the hassle of installing any software.Try New IP Now and change your IP address instantly.
Share:

Researchers Release tool that can take down Secure Websites

The THC-SSL-DOS tool released on Monday exploits a flaw in SSL(Secure Sockets Layer) renegotiation protocol by flooding the web service with multiple renegotiation requests over a  already established SSL connection for a new key. This works in same way as more common DOS(Denial of service) attacks , except the fact that this flaw in SSL renegotiation takes up more resources than a single HTTP request, hence leading to taking down a large webserver with a single computer.

The tool was released by a group of German Researchers called the Hackers Choice to exploit the flaw in SSL, which is used in many of the secure web services like Email, Banking etc, to transfer secure data across the network between user and a website without interception by a third person.
The Researchers said in a blog post- “We are hoping that the fishy security in SSL does not go unnoticed. The industry should step in to fix the problem so that citizens are safe and secure again. SSL is using an aging method of protecting private data which is complex, unnecessary and not fit for the 21st century,”.
This exploit can allow a single laptop to take down an average server with a greater Bandwidth over a standard DSL connection . It can also take down multiple larger Webservers with few computers. The group claims that the attack would also work on non SSL enabled websites with few modifications on the tool.
For more info-The Hackers Choice
Share:

8 More Important Security Enhancements

1. Check Windows Update and Office Update regularly (http://office.microsoft.com/productupdates); Click on the Automatic Updates tab in the System control panel and choose the appropriate options.
2. Install a personal firewall. Both SyGate (www.sygate.com) and ZoneAlarm (www.zonelabs.com) offer free versions.
3. Install a free spyware blocker. I am choose SpyBot Search & Destroy (http://security.kolla.de). SpyBot is also paranoid and ruthless in hunting out tracking cookies.
4. Block pop-up spam messages by disabling the Windows Messenger service.
Open Control Panel >> Administrative Tools >> Services and you'll see Messenger
Right-click and go to Properties, Set Start-up Type to Disabled and press the Stop button. Bye spam pop-ups!
5. Use strong passwords and change them periodically. Passwords should have at least seven characters; use letters and numbers and have at least one symbol.
undefined
6. If you're using Outlook or Outlook Express, use the current version or one with the Outlook Security Update installed. The update and current versions patch numerous vulnerabilities.
7. Buy antivirus software and keep it up to date. If you're not willing to pay, try AVG Free Edition
8. If you have a wireless network, turn on the security features: Use MAC filtering, turn off SSID broadcast, and even use WEP with the biggest key you can get.
Share:

Security Software That Can Detect And Kill Hidden Trojan Virus And Keylogger

In your system some times many harm full program run like keylogger ,virus and trojan which are hidden and you do not capable to remove it, So today i am going to introduce you with a software which remove all the hidden harm full program from your system and increase the security of your computer system.


Process Revealer

This software launch by LOGIXOFT. Process Revealer is a free security software that can detect and kill hidden processes.
Process Revealer Free Edition is a free hidden process detector that reveals what does not appear in standard detection utilities like Windows Task Manager. Process Revealer provides detailed information about each process running on your computer to help you know if a process is related to a malicious program. Hidden programs are automatically highlighted in the interface and can be removed in one click.
Share:

N-Stalker Helps you Finding Web Vulnerabilities Before HACKER Do!


N-Stalker Web Application Security Scanner is a Web security assessment tool. Incorporates well-known N-Stealth HTTP Security Scanner and 35,000 Web attack signature database.
Its patent-pending self-owned technology allows to scan Web applications against...
1: SQL XSS injection,
2: buffer overflow,
3: parameter tampering and much more.
4: Component-oriented Web Security.
5: Free Edition includes free Cross-site script (XSS) scanning.
What's new in this version: Version 2012 includes...
1: new spider engine to fetch modern websites effectively,
2: New attack engine to enhance assessment and avoid false-positives,
3: New attack signatures and patterns. More accurate detection.
For download it Click here
Share:

DISCLAIMER

The information provided on hottechtips.blogspot.com is to be used for educational purposes only. The website creator is in no way responsible for any misuse of the information provided. All of the information in this website is meant to help the reader develop a hacker defense attitude in order to prevent the attacks discussed. In no way should you use the information to cause any kind of damage directly or indirectly. The word “Hack” or “Hacking” on hottechtips.blogspot.com should be regarded as “Ethical Hack” or “Ethical hacking” respectively. You implement the information given at your own risk.