Just about every geek and nerd that wants to be a hacker always wants to skip straight to the good stuff, and it’s no wonder why. There’s a certain amount of mystery, intrigue, and awe in being able to used advanced tools (such as those found on Kali Linux like Metasploit) to hack into another computing system. Hackers have been around for decades now, and are frequently present in action and thriller films, such as The Matrix. And to be fair, we’ve gone through some detailed guides that show how to use these tools.
For instance, we’ve already covered NMAP, Metasploit, and other similar tools. But there’s one big problem. These tools work almost exclusively at the command line, or in Linux, the BASH shell. And even the highest quality guides are flawed – especially in the hands of a newb. You see, a single article can’t hope to cover every eventuality, caveat, an ‘gotchas.’
Computers are composed of individual parts made all around the world, and assimilated as a hodgepodge of different manufacturers’ parts. The amount and type of memory, wireless card, processor architecture, HDD or SDD, peripheral devices, and more vary greatly from system to system, and Kali (or for that matter, Linux) can’t hope to to run exactly the same on every different piece of hardware.
Even if you’re hacking guide is highly detailed, chances are that you’ll run into a surprising error that doesn’t fit in nicely with your guide’s 12 easy steps. And most guides can’t hope to account for every single error. Doing so would lie far outside the scope of the guide.
As such, it’s imperative that hackers and penetration testers who want to learn how to hack have a solid foundational knowledge of common BASH shell concepts. Look folks, though they may not be the most ‘sexy’ commands, there are some simple commands that you need to know like the back of your hand.
If you get caught on the job not knowing how to run these simple commands, you’re likely going to get laughed out of the office – and perhaps even be handed a pink slip. So, today we’re going to be talking about general purpose BASH commands that you really need to know before moving on to advanced hacking topics. Basically, you need to be comfortable in a command line environment, so let’s start with one of my favorites: network interface configuration commands.
The network interface commands are also exceptionally useful for troubleshooting connectivity problems. Also, note that with few exceptions, the following commands are mostly universal. That is, they can be utilized on almost all varieties of Linux, and some of them can even be used in an OSX environment since Mac OSX is a descendant of BSD.
For reference, we are going to be taking a closer look at how to make shell configurations regarding the following topics:
- Network interfaces
- Canceling commands
- Default gateways and routes
- Piping commands
- Viewing and killing processes
- File system navigation
Many of these topics will be useful to those wishing to test for Linux certifications such as the Comptia Linux+ or LPI certs. To put it bluntly, you should really know these basics before trying to run advanced packet capture and Metasploit demos. So, without further adieu, let’s start with the network interface commands.
Network Interfaces
Whether using an internal wireless card in your laptop, Ethernet, or an external USB wireless interface, you had better darn well know how to configure them. Just about all of the wireless hacking demos we’ve run involve configuring a wireless interface in some way, and you need to know how read their current configuration. So, let’s start with the basics. The following command pulls up current interface configuration data:
- ifconfig
Those of you who have worked in the Windows command prompt can easily remember this command, because it only has a single character that varies from the Window’s ipconfig command. Go ahead and run it, and notice that all of the data is separated by interface.
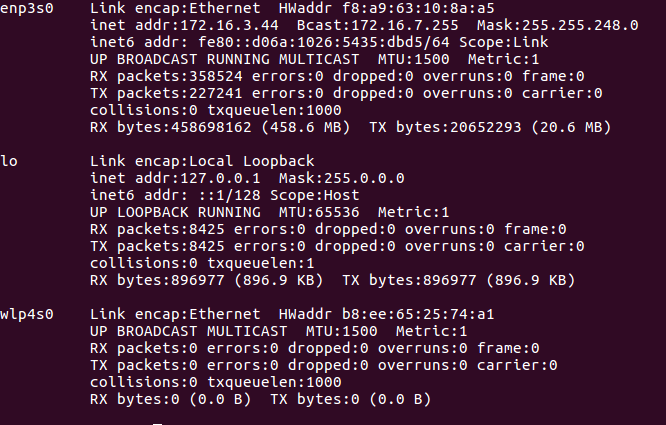
This command is incredibly useful because it will quickly display encapsulation type, MAC address, IP address, broadcast address, subnet mask, transmit and receive packet-count, total information sent over the interface, and other useful information. But it doesn’t show all the available data for that interface. For a more detailed report of interface data, simply run the following command:
- ifconfig -a
In the command listed above, the -a parameter indicates ‘all.’ It will show incredibly detailed information that is useful to network engineers, and can help troubleshoot network interface problems. If your terminal window is getting too messy, you can simply enter the clear command to clear things up a bit. Also, you can run ifconfig followed by an interface’s name to only display parameters for that individual interface.
Furthermore, you’re going to need to know how to bring an interface online and offline (or up and down). Often times, after making a configuration change to an individual interface, it’s necessary to ‘bounce’ the interface by bringing it down, and then bringing it up again. You do need to have administrative privilges to run these commands. Also, note that if you’re running a live version of Linux – such as one installed on a bootable USB flash drive like Ubuntu Live – you’ll likely need to precede the commands with the sudo command.
- ifconfig [interface_name] down
- ifconfig [interface_name] up
So, for instance, if I wanted to reset my Ethernet interface, I would run the ifconfig eth0 downcommand. After waiting for a decent amount of time (30 seconds at least to be safe), I’d then run the ifconfig eth0 up. Note that the interface’s name includes a zero rather than the letter of the alphabet sandwiched between ‘N’ and ‘P.’ Your interface names may differ, too, so just run the ifconfig command to display the interfaces’ names.
And arguably, one of the largest reasons that Linux is so powerful is due to it’s command line. You can make configurations within seconds without having to go through long and contrived GUI windows to find the correct setting. It would be a good idea to know how to change IP address information on a per-interface basis as follows:
- ifconfig eth0 10.1.1.2
- ifconfig eth0 netmask 255.255.255.0
- ifconfig eth0 broadcast 10.1.1.255
In order, these commands will set the IP address, subnet mask, and broadcast address of the specified interface – which is eth0 in this example. Next up, you’ll also want to know how to set an interface in promiscuous mode. This is an undoubtedly crucial tool for most kinds of wireless hacking, so let’s first define what this mode does.
Through various network mediums and address types (such as broadcast frames on wireless interfaces or broadcast data like ARP protocol data), an interface can be presented with frames that weren’t addressed to the receiving interface. The default action of the interface is to drop these packets, since it’s not the intended destination. However, many attacks leverage the information contained within the frames and packets.
By setting the interface in promiscuous mode, the interface will receive and process the frames that weren’t intended for it, and instead send them to the CPU for processing. Use the following command:
- ifconfig eth0 promisc
This mode of operation is frequently used in a lot of different network tools, such as protocol analyzers and packet captures. If you want to shut off promiscuous mode on an interface, simply run the following command:
- ifconfig eth0 -promisc
Canceling a Command
Sometimes, for whatever reason, you may find that a command has frozen, locked up, or is simply taking too long to complete. Linux novices typically find this incredibly frustrating, and don’t know how to cancel the command. Instead, they simply close out the terminal window and open a new one – but there’s a much simpler way. Simply issue the following command hotkey to cancel currently running command or one that is hanging:
- ctrl + c
To test it out, run something like a ping command. For instance, ping Google’s DNS servers with the ping 8.8.8.8 command. You’ll notice that the shell will continue pinging the server on an endless loop. To stop the ping operation, just run the ctrl + c command and it should terminate.
Default Gateway and Routes
Every competent network engineer and penetration tester should have a firm grasp on routing technologies. It’s fairly atypical to setup custom routes for an individual computer, because that function is typically controlled by routers. Nevertheless, you should know how to view your Linux system’s routing table. And the command couldn’t be simpler, as follows:
- route
The most practical purpose for this command is to check and verify your default route. In a home setting, the default route is going to almost always be your wireless router. But in corporate and professional network environments, there may be more complex configurations.

Piping Commands
One of the wonderful and powerful qualities of the BASH shell is that one command’s output can be used as input for another command. These features are unbelievably flexible, and allow for command formatting and complex configurations. However, we’re only going to be discussing the most rudimentary of piping techniques today.
You may have noticed that sometimes when entering a command, the entire shell window fills up with loads of text that all flit by in fractions of a second. If you want to read the output page by page, you can simply pipe it to the less command. The pipe symbol is located directly above the enter key on most keyboards, and looks like a solid vertical line. The syntax to pipe command output to lessfollows:
- [command] | less
We’re going to be using this in the services and daemons section, but for now test it out on a simple command. For instance, issue the following command:
- ifconfig -a | less
Doing so will display your network interface information one page at a time. Now you can use the arrow keys to move up and down the output, or hit the spacebar to move down an entire page. If you want to exit the output display, simply type the ‘q’ key to quit and be returned to the command prompt.
Viewing and Killing Currently Running Processes
There are a seemingly endless number of process running diligently in the background of your Linux system. It would be of great benefit to know how to view them and potentially kill them. Sometimes a process might malfunction, and even cause a memory leak. There are so many processes that, for the sake of this demonstration, we’re going to be piping the command output to less. Run the following command:
- ps aux | less
Note that there are actually several ways to view currently running processes, too. Alternatively, you can use the jobs or top commands. They will show you related information, such as the owner, process ID, and other vital information about background processes.
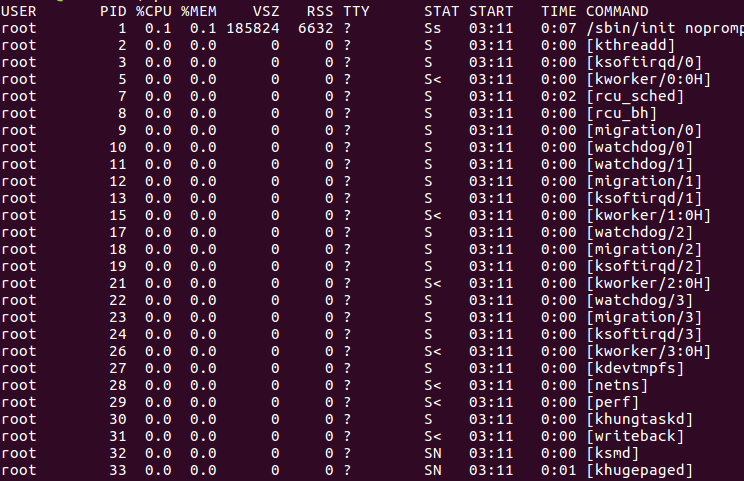
However, once in a while, you may need to shut one of these processes down. It’s rare for a process to render a Linux system completely unusable. Nevertheless, runaway and zombie background processes aren’t uncommon in a Window’s environment. And you should also consider that Linux is susceptible to viruses more than ever before. So, being able to kill a process is crucial. Simply use the following command:
- kill [process_id]
For example, if I wanted to kill my Firefox process because it crashed and wasn’t behaving properly, I would issue the command as follows:
- kill 17648
It’s just a matter of looking up the process ID before running the kill command.
File System Navigation
Though understanding the entirety of the Linux file system lies far outside the scope of this guide, knowing how to navigate the file system from the command line is one of the most basic and fundamental skills. The first command you need to know relates to knowing which directory you reside in.
In Linux, this is known as your current working directory. And the command to display that information is known as the print working directory command, as follows:
- pwd
By default, you’re likely in the home directory. To change directories, simply use the following command:
- cd [directory]
For instance, if I wanted to change to the root directory (assuming I had root privileges), I would type ‘cd /’. Also, if you simply wanted to move up one level to the next highest directory, you can issue the ‘cd ../’ command. But knowing what files and folders are available for navigation requires you to run the list command. Doing so will show you all files and folders within your current working directory. The basic command is as follows:
- ls
This command will simply display common files and folders, but it has several useful parameters to display more information. If you wished to view the read, write, and edit permissions for the current user or group, simply issue a long-listing command as follows:
- ls -l
This command will also display when a file was created or last edited, though it won’t display hidden files. If you’re trying to make a configuration change to an application file, it will likely be hidden, so simply run the following command:
- ls -a
Note that all of the hidden files and folders will be preceded with the ‘.’ character. There are actually a lot of different flags that can be used with the ls command, but this should suffice for basic file system navigation. Between the ls, cd, and pwd commands, you should be able to navigate throughout your HDD/SDD’s Linux file system by only using the terminal.
Final Thoughts
These don’t make up every foundational command that you should learn in order to be competent using the BASH shell. However, these are certainly some of the most important from a perspective of penetration testing and hacking. In particular, you should learn the ifconfig and route commands, and know them like the back of your hand.
If you’re new to the BASH shell, I’d learn these commands – and learn them well – before pursuing harder tutorials. But after using the shell for a while, perhaps as little as a week or two, they should become second nature to you. And having the ability to pull up all of this information on the fly is what makes Linux so powerful.
You won’t have to navigate through a tedious organization of text fields and GUI windows. Though Windows does have the CMD prompt, it isn’t anywhere near as powerful as the BASH shell. Once you factor in the ability to write and run scripts and use advanced tools like Metasploit, you’ll begin to understand what makes Kali Linux so formidable. Stay tuned for more tutorials as well, because we’ll run through tutorials to help demystify the most popular Kali command line tools that hackers and penetration testers use to break other computing systems.