Showing posts with label android. Show all posts

Mobile Hacking Part 1: Introduction and Device Building

Welcome back everyone! Today we start a brand new series about mobile hacking. This article will be an introduction to the concepts we’ll cover throughout the series, and a tutorial on how to build our own mobile hacking device. So, without further adieu, let’s get started!

Introduction and Overview

Smartphones are everywhere. Most people carry one with them majority of the time. Imagine if we could turn a cell phone into an advanced hacking machine, capable of launching targeted attacks. We’d be immensely powerful in the world of mobile devices. Being able to hack from a mobile devices comes with insanely valuable advantages. Throughout this series we’ll be learning to use these advantages in order to further enhance our hacking abilities.
Now that we have a premise for this material, we need to explain what we’ll be covering in this series. In order to avoid divulging too much information about the upcoming articles (no spoilers!), I’ll give a general overview instead of a specific timeline.
  • The advantages and disadvantages of mobile hacking
  • The different options in mobile hacking equipment and setups
    • Also including the pros and cons of each set
  • Mobile specific hacks
    • Hacks that can easily/only be performed on a mobile platform
  • Mobile v.s. Mobile
    • Hacking mobile devices with mobile devices
  • Additional (optional) mobile equipment for specialized attacks
It may not seem like a lot, but trust me, these topics will seriously help us grow and develop as hackers.

Building our First Mobile Hacking Device

Now that we have a basic overview of what we’ll cover throughout this series, we can move on to building our own hacking device! We’ll start by explaining the tech behind the device we’re going to make, and then we’ll get right into it.
It’s time to introduce a company that made the technology we’ll be using today, Pwnie Express. Pwnie Express makes a variety of hacking devices available for purchase. Among these devices is the Pwn Phone. Normally you’d have pay a little over $1000 for a Pwn Phone. But for those with enough ambition, the Pwnie Express maintains the AOPP (Android Open Pwn Project), which allows us to build our very own Pwn Phone! Just a heads up; the AOPP only supports a handful of devices, before continuing, I recommend you make sure your device is supported!
Now that we know where this technology is coming from, we can get building. We’ll be building our Pwn Phone out of a LG Nexus 5, running completely stock ware. So, let’s get started!

Step 1: Download Needed Files

In order to start making our pwn phone, we need to download a handful of files. Since we here at Hacking Loops care about you, I’ve made a simple BASH script to do all the downloading for us. We need to download this script, format it, and make it executable. Let’s do all that now:
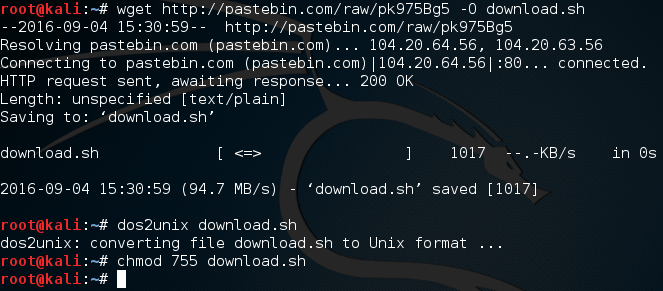
downloading-download-script
Now that we have this download script, all we need to do is execute it and wait. These files are quite big, so you’ll need to have some patience. It will store all the downloaded files in a new directory named project. So, let’s execute this script and wait:
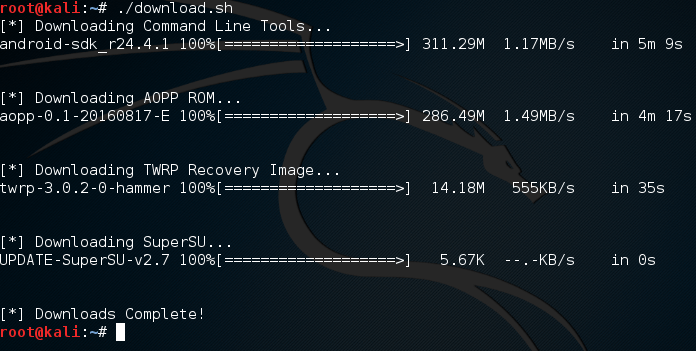
executing-download-script
Now that we have these files, we need to do some work with them before we continue.

Step 2: Unpack the Android Command Line Tools

In order to work with our Nexus, we need to use the Android SDK platform tools. In order to use these tools, we need to unzip the Android file we downloaded in the project directory:
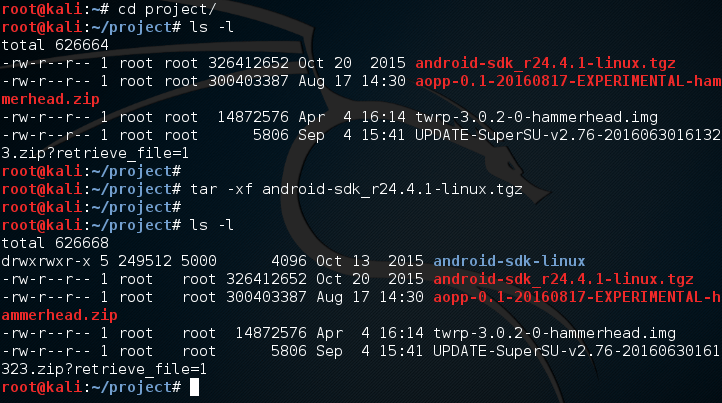
unzipping-SDK-tools
Here we use the tar command in order to extract the Android SDK zip archive into a new directory name android-sdk-linux. Inside of this new directory is an install tool that we need to use in order to install the proper platform tools. Let’s move into this directory and use the update tool:

executing-google-install
By using these settings with this install tool, we can install just the platform tools, not any of the other software that would be installed by default. Once we execute this command, we will receive a LOT of output. Eventually we’ll be given a prompt asking if we accept, answer yes and we can continue:
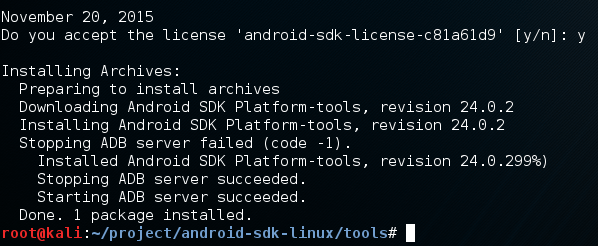
finishing-install
Now that we’ve finished the install, a new directory can be found one directory up named platform-tools. We need to add this directory to our PATH so we can use the tools from anywhere, which will make our job way easier:

editing-PATH
Now that we’ve added this to our PATH, we need to do some work on our device before we can continue.

Step 3: Enable USB Debugging

Before we can continue, we need to enable USB debugging on our device so we can modify it from our Kali system. In order to enable USB debugging, we first go to ‘Settings’, and scroll all the way down to ‘About phone’:
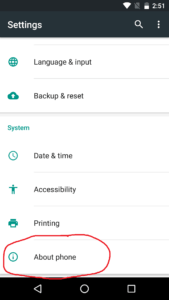
about_phone_normal(1)
Inside of this option we see a large amount of information about our device. Near the bottom of the menu, we can see a tab labeled ‘Build Number’:
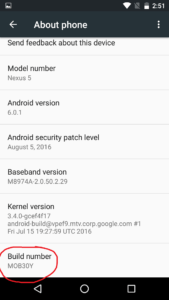
build_number(2)
If we keep tapping the build number option, we will unlock developer options for our device. Once it happens we will be given a notification:
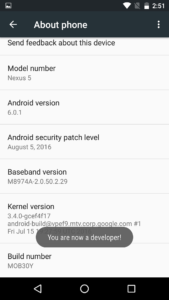
dev_options_unlock(3)
Now that we’ve been given this notification, we can go back to the main settings menu and see a new option:
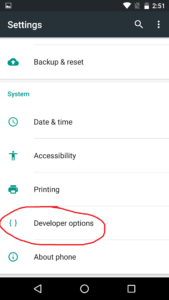
new_menu_ops(4)
Developer options allows us more power over our device, including the ability to enable USB debugging. Around the middle of the menu we can find the option to enable it. Once we do, we will see a prompt asking for us to confirm our decision:
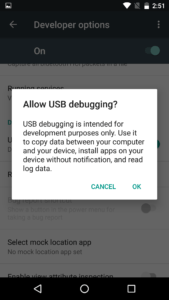
allow_USB_debug(5)
There we go. Now that we have USB debugging enabled, we can continue.

Step 3: Unlock the Bootloader and Install TWRP Custom Recovery

In order to install the AOPP, we need to install it through a custom recovery. If we’re going to use a custom recovery, we ought to install one first! We’re going to be install the Team Win Recovery Project (TWRP for short). This will allow us to backup and install software on our device easily.
But, there’s a catch. In order to install TWRP, we need to unlock the bootloader.  This is incredibly easy so let’s just get it out of the way.  Inside of the compressed file that we setup earlier is a tool named fastboot. This tool allows us to interact with the device while it’s in the fastboot state. In order to access the fastboot menu, power down your device, then hold the power and volume down buttons at the same time until a menu with an open android appears.
Now that we have the fastboot menu open, we need to make sure our Kali system is recognizing the phone. We can tell fastboot to list all the devices current connected. Once we do that we’re going to use fastboot to unlock the bootloader so we can install TWRP. Let’s do these things now:
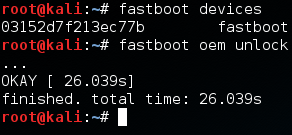
fastboot-list-and-unlock
Now that we have the bootloader unlocked, we can flash the TWRP recovery image to our device. We also use fastboot for this, and the process is rather simple. Let’s flash TWRP now:
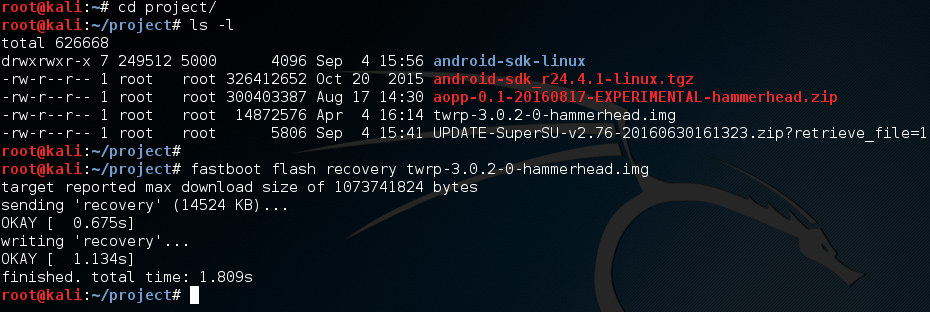
flashing-TWRP

Now that we’ve installed a custom recovery, we can continue.

Step 4: Install the AOPP ROM

Now that we can use our custom recovery, we can install the AOPP. In order to boot into our recovery, we need to select the “Recovery” option from our fastboot menu on our device. You can scroll through the options by using the up and down volume buttons, and choose the selected option with the power button.
We should see the boot screen for TWRP, once it loads it should look something like this:
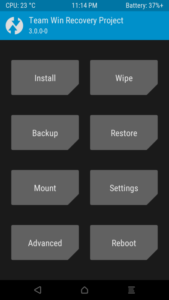
twrp menu
Now that we’re in TWRP, we need to do some wiping. To do this, we need to select the “Wipe” option, and select everything except Internal Storage and then swipe the bar at the bottom of the menu. After a few seconds, the wipe should be successful.
Now that we have wiped our system, we need to move the AOPP file over from our Kali system to our device. We can do this using a tool known as android debugging bridge (adb). We need to stay in recovery mode to use adb, so let’s use adb to see if the device is ready. If it is, we’ll push the zip file from our Kali over to the device:

push-AOPP-zip
Now that we’ve pushed the AOPP zip file to the device, we need to go back to the main TWRP menu. From here we select the “Install” option. Once we select this option we should see a space that lists file names. Among these names should be the AOPP that we pushed to the device. Select this file and follow the confirmation prompts to flash it to the device.
Alright, we’re almost done installing AOPP. There’s only one more thing we need to do. We need to push the  SuperSU zip file to the device, let’s get that out of the way:

pushing-SuperSU-zip
Now that we have all this in place, we should be able to reboot our device. Only one more step to go until have a fully functional pwn phone!

Step 5: Setup the Pwn Phone Environment

This final step is very easy. All we have to do is boot into our new system and follow the setup prompts. Once this is complete, we will be greeted with the pwn phone home screen. But you may notice something, we don’t have any tools yet!
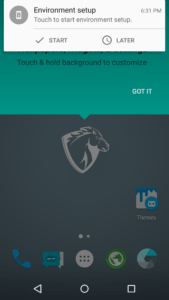
In order to get the tools we need, we need to setup the Pwnix environment. There should be a notification at the top of the screen prompting us for to setup the environment:
env_setup
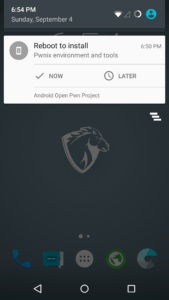
Once we select start, we will be prompted by SuperSU asking us if we want to allow the Pwnix setup root access. Once we grant it root permission, the setup will begin. Once the setup is complete, we’ll be prompted to restart to finish the install:
reboottoinstall
Once we restart we should have quite a few tools ready for use. But if we want to greatly expand the amount of tools on our device, we need to perform an update. We should have an update prompt at the top of the screen in the same place the setup prompt was. Once we perform this update we should have a fully fledged pwn phone!

There we have it! We successfully built our very own pwn phone. This device is incredibly powerful and I intend to prove it. In the next article we’ll be going deeper into the advantages of mobile hacking. I’ll see you there!
Share:

How To Find Out Who’s Tracking You Through Your Android

Let me tell you, those days are gone when a smartphone was only used for voice communication. We are living in a generation where our smartphones are more than a powerful computer that we used to carry in our pocket.
If we talk about an Android operating system, the reason people choose Android over other mobile OS is that this platform has different kind of features for every particular purpose. Today in this virtual world, there are so many security issues like lots of viruses, malware, trojans, and keylogger’s that can influence our devices.
Most of the malware is targeted to an Android operating system because Android is now powering a majority of smartphones. Safety should always be our top priority in these cases. Here we are going to mention few short codes that will help you find the settings of your phones and to find out either your messages and information are being tracked.
We have managed to collect some of the useful codes for Android users which will help those who’re worried about being tracked.

Code 1: *#21#

This code will let you find out whether your messages, calls, and other data are being diverted. You can find details about call forwarding. You can even find out where your data, voice, fax, SMS, sync, async, Packet access, and pad access call forwarding enabled or disabled.

Code 2:  *#62#

If your friend tells you, that your number is saying no-service or no-answer, then you need to dial this code on your smartphone to find out where yourcalls, messages, and data are being redirected. There are possibilities that your calls are being redirected to one of your cell phone operator’s numbers.

Code 3:  ##002#

This is a universal code to deactivate all call forwarding. This will immediately switch off all the redirections from your phone. If you feel that your call is being redirected, then you can dial this code to stop the redirecting. It will be a good idea to use this code before you have to use roaming so that the money won’t be taken from your account.

Code 4: *#06#

This code is used to find the International Mobile Equipment Identifier (IMEI). This code will be very useful to find the IMEI number of your smartphone. You can note down your IMEI number in a safe place. With the help of IMEI number, you can find your phone if someone steals it.

Code 5: *#*#4636#*#*


This special code allows anyone to track your location and also determine whether someone is following you.

Type in the following code in dial pad and then select the section called UMTS Cell Environment, then choose UMTS RR info. Now note down all the numbers under the Cell ID.
Now move to the main menu and then click on MM info tab > Serving PLMN. Now note down the numbers under Local area code (LAC).
After noting down these two numbers open the website opencelid and select the fourth tab to the left. From there you can determine the location on the map of the basic station that your phone is connected to.
So, these are the 5 codes which will help you to find out more about the settings of your phone and to find out whether your messages are protected or not. Hope you like the article, share it with your friends too!
Share:

10 Must Have Free Android Apps

Lately i have been in love with my android phone, Once i was a guy who used to see phones as silky small dumb device, but soon things changed when i first purchased my Lg optimus me android phone , Following are some of the apps that i use and cant live without it  :D


I thought  i should share this article with my readers who use android phones and see how many of you use these apps . The best thing about this post is  i am  actually posting this from my phone (via blogger app)


10 Must Have Free Android Apps

1. SetCPU

Root Required 

SetCPU is a tool for changing the CPU settings capable of overclocking and under clocking  SetCPU allows the user to exert total control over how fast, or slow, the processor runs at any given point in time. As an example, SetCPU can force the processor to sit at its lowest setting whenever the screen is turned off, but to use a range between 240MHz and 806MHz as needed while the phone is awake. For phones that have the ability to drastically overclock, SetCPU can help ensure that they don't overheat by keeping watch on the temperature, and acting accordingly. Overclocking or not, battery savings and overall performance can be greatly enhanced using this app


2. Titanium Backup


Titanium Backup is the most powerful backup tool on Android, and then some.You can backup, restore, freeze (with Pro) your apps + data + Market links. This includes all protected apps & system apps, plus external data on your SD card. You can do 0-click batch & scheduled backups. Backups will operate without closing any apps (with Pro). You can move any app (or app data) to/from the SD card. You can browse any apps data and even query the Market to see detailed information about the app.


3. Lookout


Protect your phone with award-winning security & antivirus from Lookout Lookout is lightweight, free antivirus for Android. it also has other features like finding lost mobile using GPS, Backup  etc


4. SSHDroid


Connect through SSH to your device! SSHDroid is a SSH server implementation for Android.This application will let you to connect to your device from a PC and execute commands (like "terminal" and "adb shell") or edit files (through SFTP, WinSCP, Cyberduck, etc...).


5. Advanced Task Killer


Just because Android apps have no "close" button doesn't mean they shut down when you return to the home page or move on to another app. You calendar, note pad, and programs in which you turn on event notifications might periodically run in the background, depleting your battery. Download and run Advanced Task Killer Free. You'll be amazed at the apps that run on start-up without your knowledge. While you can kill the task killer along with other apps, we recommend letting it run so you can easily use it a couple times throughout the day. Being able to set conditions for killing running apps would be an interesting future touch.


6. Where's My droid


When you lose your phone while the ringer is turned off it can be impossible to find it. Where's My Droid fixes that problem. After texting your phone a custom attention word the app turns the ringer volume up and makes your phone ring. It's also possible to get the GPS location of your phone in latitude and longitude and a link to Google maps


7. Orbot


Enhance your privacy, break through firewalls and communicate more safely.Orbot is the official port of Tor to Android. Tor is a network of virtual tunnels that allows people and groups to improve their privacy and security on the Internet.


8. Busy Box

Busybox is often called "the Swiss Army Knife of Embedded Linux," because that's what it basically is. It's not an actual app that you run, but instead provides all the Linux/UNIX commands that we know and love. Without the commands installed, the barebones "Linux" that Android runs on top of can't really do too much, making apps like Terminal Emulator nearly worthless.


9. Wifi Anaylyzer


Turns your android phone into a Wi-Fi analyzer!!Shows the Wi-Fi channels around you. Helps you to find a less crowded channel for your wireless router.


10. Es File Explorer


ES File Explorer for Android is a free, featured all-in-one file manager & application manager & task killer & drop box client & ftp client which explores your phone and your computer. It allows android users anywhere in the world to manage their resources for free, it makes easy to manage, stay connected using your 3G, EDGE or WiFi, and share with friends, upload photos, watch videos.

Hope the above info helped you ,If you like the above apps please let me know them via comments
Share:

How to Download Torrent files on Your Mobile Phone

Torrent have become part of our daily internet usage. But what if you need to download a Torrent file by a wifi or any network connection outside your home, like in your workplace or college. Well Torrent clients have been around for that from few years and here are some of the popular Torrent clients you can use to download the torrent file using your Mobile Phone.


Symbian
SymTorrent 
  • The first and only BitTorrent client for Symbian OS Phones and its free and Open Source.
  • SymTorrent is available for mobile devices based on the S60 Platform 3rd and 5th edition .
  • Capability to start download via the browser.
  • Resumes partial downloaded torrents even after restarting the application.
Java ME Phones
MobTorrent is the first Bittorrent client for Java ME based mobile phones like Nokia S40, Nokia 6500 and supports all Java ME capable phones with the proper JSRs.

iPhone
  • A popular torrent client for iPhone,iPod and iPad’s.
  • Application was actually envisioned as a tool for managing ImageShack‘s torrent download service, but now extended to other torrent sites such as IsoHunt and Mininova.
  • IS Drive costs $4.99 in the Apple App Store, and this service comes loaded with either a monthly or daily fee.
Android
  • Supports all popular clients like µTorrent, Transmission, rTorrent, Vuze, Deluge and BitTorrent 6.
  • Lets you control Speed and performance of the torrent Download.
  • Adding a torrent file is easy via the integrated search, RSS feeds or the barcode scanner.
  • Easy management of torrents through home screen widgets and background alarm service.
Windows Mobile
  • Direct save to file, no more temporary file
  • Full and consolidated file saving modes.
  • Trackerless Torrents (DHT) based on Kademlia
  • Peer Exchange (PEX)
  • Plain Text and RC4 Protocol Encryptions
  • Advanced extensions
  • HTTP Seeding
Share:

DISCLAIMER

The information provided on hottechtips.blogspot.com is to be used for educational purposes only. The website creator is in no way responsible for any misuse of the information provided. All of the information in this website is meant to help the reader develop a hacker defense attitude in order to prevent the attacks discussed. In no way should you use the information to cause any kind of damage directly or indirectly. The word “Hack” or “Hacking” on hottechtips.blogspot.com should be regarded as “Ethical Hack” or “Ethical hacking” respectively. You implement the information given at your own risk.