How to Launch an Untraceable DoS Attack with hping3

Welcome back everyone, lets talk about DoS attacks and hping3! DoS attacks are some of, if not the, most common attack (DoS stands for Denial oService). Not to be confused with DDoS, a DoS attack is when a single host attempts to overwhelm a server or another host. This is done by expensing all resources, so that they cannot be used by others.
hping3
There is a tool by the name of hping3 that allows the attacker to craft and send custom packets. This allows us to do many things with it including recon, possibly some basic exploitation, but for now we’re going to use it to launch a DoS attack. There are mutliple kinds of DoS attacks, but today we’re going to launching a SYN flood. This sends requests to a server as fast as it can. When these requests are processed, it will take up the server’s resources, and will render it unable to respond to any actual users trying to use it.
The problem with DoS attacks is that when we send all these packets the server, it has our address in it. All the administrator has to do is look at the logs and turn our address into the authorities, then we’re behind bars in a matter of days. We’re not only going to be launching a SYN flood, but we’re going to spoof our address so we don’t get thrown in the big house! Before we launch the attack, let’s deeper discuss the concept of SYN flooding.

SYN Flooding

As we previously stated, a SYN flood is sending an insane amount of requests to a server in order to use up all it’s resources. But you may be asking “What does SYN have to do with using up resources?“. Well, it’s all about the TCP three-way handshake.
If you haven’t already read the second recon article, I suggest you do so in order to understand the TCP three-way handshake. Remember, SYN stands for synchronize. When we send a SYN packet, we’re requesting to establish a connection.
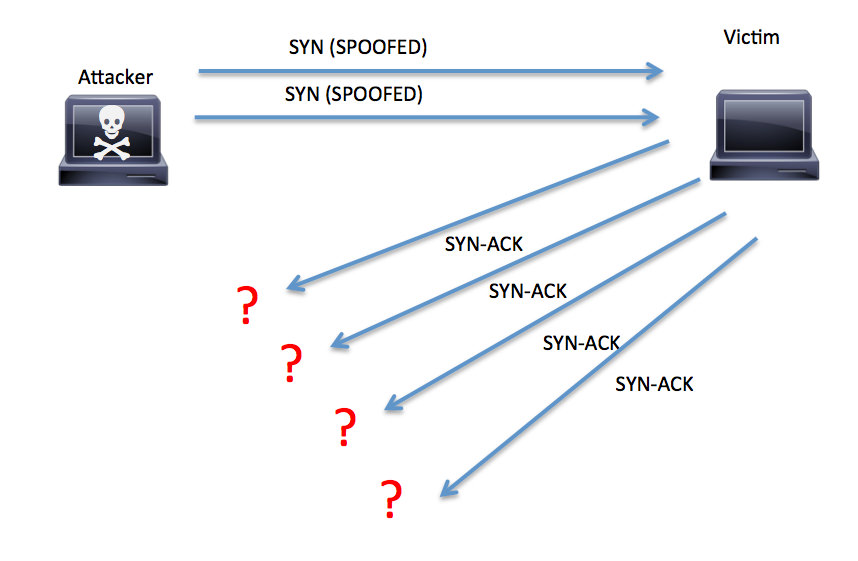
We can see that the attacker sent many SYN packets (with spoofed addresses) to the victim. The victim responded with a SYN-ACK to confirm the connection, but since there was no response, it sends it again and again, using up all it’s resources! Also, since the attacker used a fake address, the administrator will have a much more difficult time tracing the source of the attack.
Now that we know how SYN floods work, let’s get to launching the attack!

Launching the DoS Attack

First things first, we’ll need to look at the help page for hping3. In order to condense the output, I’m going to grep the lines that are essential. Let’s see the flags we need to use:
fixed hping help
We can see here that we need to use –flood–interface-S, and –rand-source. These flags are fairly self-explanatory, but let’s run through them. Using –flood will set hping3 into flood mode. This is the flood part of our SYN flood. Then we have –interface, so we can decide which network interface to send our packets out of. Finally we have –rand-source, this will randomize the source address of each packet. Not only will source not point back to us, but it will appear to come from a wide range of addresses, this increases the trace difficulty even further.
Now that we know what flags we’re going to use, let’s launch our attack. I’m going to be launching this attack against a VM I’ve set up, Metasploitable 2. First, let’s ping the Metasploitable VM to make sure it’s up and running, then we’ll ping it again when we launch our attack to see the effect. Let’s ping it now:
good pignsAlright, our VM is up and running. Now let’s take a look at the command we’ll use to launch our attack before we do it:
fixed hping3 com
Alright, now that we have our command let’s execute it. Now that we’ve started the attack we should see some output like this:
fixed hping output
There we go! Now we’re flooding the target. To see our spoofed packets in action, let’s open up one of the best network sniffers out there, wireshark. We should be able to see packets from multiple addresses being flooded towards the same address. Let’s take a look at the packets the wireshark has captured:
fixed wiresharkHere we can see 5 packets, each with it’s own unique source address! We can see that they are being send to our target at the IP 10.0.0.37, with the SYN flag set. Now that we’re attacking our target, let’s retry pinging the target and see what happens:
faild pingsWe can see by this ping tool output that our pings failed, we can’t reach the server anymore! This proves that our attack was effective in that the server spent all it’s resources responding to our attack instead of the real users, we’ve successfully DoS’d our target!
Since we’ve randomized the source of every packet, it will be much more difficult for an administrator. Now we can launch DoS attack without landing ourselves a seat in prison!
I know this tutorial isn’t really related to any of my currently running series such as the recon series. But due to the recently published article on DoSing with LOIC I felt like this was necessary so if anyone does decide to use this power for evil they won’t land themselves in prison. I’m just looking out for my fellow hackers! The next article will be the start of a brief course teaching the basics of Python, I’ll see you there!
DISCLAIMER: hottechtips.blogspot.com does not condone the use of these tools for illegal activities, we’re just here to educate!
Share:

Understanding Google Dorks and How Hackers Use Them

GoogleDorks
The idea of using Google as a hacking tool or platform certainly isn’t a novel idea, and hackers have been leveraging this incredibly popular search engine for years. In fact, Google Dorks have their roots in 2002 when a man by the name of Johnny Long started using custom queries to search for elements of certain websites that he could leverage in an attack. At its core, that’s exactly what Google Dorks are – a way to use the search engine to pinpoint websites that have certain flaws, vulnerabilities, and sensitive information that can be taken advantage of. As a side note, some people refer to Google Dorks as Google Hacking (they’re more or less synonymous terms).GoogleDorks
Believe it or not, Google Dorks can uncover some incredible information such as email addresses and lists, login credentials, sensitive files, website vulnerabilities, and even financial information (e.g. payment card data). In fact, in our WordPress hacking tutorial, we listed a few Google Dorks that could be used to find SQLi (SQL injection) vulnerabilities. And the wonderful thing is that this is an incredibly passive form of attack that doesn’t draw much attention to the hacker. Unfortunately, some people use these techniques for illicit and nefarious activities such as cyberwarfare, digital terrorism, identity theft, and a whole host of other undesirable activities.
If you are reading this to learn how to break into a website and harm others just for kicks, perhaps you should pursue other interests. Let me caution you by stating that breaking into websites is an illegal activity, and it violates not only laws bur moral codes as well. If you get caught, the consequences could be dire. Then why learn this to begin with, you ask? Well, the first place any white hat hacker needs to start is with understanding how hackers operate. Only then can they plug up security holes to prevent future attacks.
Understanding Google Dorks Operators
Just like in simple math equations, programming code, and other types of algorithms, Google Dorks has several operators that aspiring white hat hackers need to understand. There are far too many to include in this guide, but we will go over some of the most common:
  • intitle – this allows a hacker to search for pages with specific text in their HTML title. So intitle: “login page” will help a hacker scour the web for login pages.
  • allintitle – similar to the previous operator, but only returns results for pages that meet all of the keyword criteria.
  • inurl – allows a hacker to search for pages based on the text contained in the URL (i.e. “login.php”).
  • allinurl – similar to the previous operator, but only returns matches for URLs that meet all the matching criteria.
  • filetype – helps a hacker narrow down search results to specific types of files such as PHP, PDF, or TXT file types.
  • ext – very similar to filetype, but this looks for files based on their file extension.
  • intext – this operator searches the entire content of a given page for keywords supplied by the hacker.
  • allintext – similar to the previous operator, but requires a page to match all of the given keywords.
  • site – limits the scope of a query to a single website.
Custom Crafting Google Dork Queries
Now that we have a basic understanding of some of the operators and how Google Dorks can be used to scour the web, it’s time to look at query syntax. The following is the high level structure of Google Dorks that targets a specific domain:
  • inurl: domain/” “additional dorks
A hacker would simply plug in the desired parameters as follows:
  • inurl = the URL of a site you want to query
  • domain = the domain for the site
  • dorks = the sub-fields and parameters that a hacker wants to scan
If a hacker wishes to search by a field other than the URL, the following can be effectively substituted:
  • intitle:
    inurl:
    intext:
    define:
    site:
    phonebook:
    maps:
    book:
    info:
    movie:
    weather:
    related:
    link:
These options will help a hacker uncover a lot of information about a site that isn’t readily apparent without a Google Dork. These options also offer ways to scan the web to located hard to find content. The following is an example of a Google Dork:
Making Effective Use of Operators
It may seem a little cryptic at first, so let me provide a few examples that show how the different operators can be used to locate content and website data. A user can make effective use of the intitle operator to locate anything on a website. Perhaps they are scraping email addresses and want to scan sites for the “@” symbol, or maybe they are looking for an index of other files.
Furthermore, the intext operator can basically be used to scan individual pages for any text you want, such as a target’s email address, name, the name of a web page (like a login screen) or other personal information to collect data about them.
The more you practice, the further you’ll be able to hone your queries to pinpoint different types of websites, pages, and vulnerabilities. Again, I need to caution you not to use these queries to attack another website, because that would be illegal and could get you into a lot of trouble. Still, Google Dorks are a great way to locate hidden information on the web, which is why hackers love to use them to find security flaws in websites.
If you want to dig into some more queries, there are some great Google Dork resources on the web.
Share:

The Ultimate Guide to Using Maltego as a Powerful Footprinting Tool

Every pentester and hacker uses tools to make them more efficient at what they do.
That includes when conducting reconnaissance.
So by now you may or may not have heard of a tool called Maltego?
When I first heard about it, I was wondering why it was such a big deal in the IT Security and Pentesting community. If you look at many of the IT Security jobs available online you will eventually come across Maltego as one of those tools companies want you to have experience with.
maltegojob1 maltegojob2
That goes without saying that you are likely to run across it as a test question when taking many of the security certifications out there as well.
I want to show you how you can use this tool to improve your Footprinting technique. As humans we are very visual creatures. For instance seeing a location on a map is much easier to understand than looking at GPS coordinates. This is exactly what I think is the genius of Maltego.
Think of it like this, we are trying to find treasure on a treasure map but we need to start filling in the map and we need to pick a starting location.   Basically you start with one piece of information and use that piece to find the next section of the map, and then use that next section to find another and so on.
Do you remember when the huge insurance firm called Anthem was hacked and 80 million social security numbers were exposed?
Maltego was used by the security firm CrowdStrike to do research, create their own treasure map and find servers that were tied to the Chinese hacker group behind that hack.(See http://krebsonsecurity.com/2015/02/anthem-breach-may-have-started-in-april-2014/).
crowdstrike
Personally, I already had some experience information gathering/Footprinting and knew that I could do all of my reconnaissance without this tool. When I first opened it up I remember thinking that this seems like a really cumbersome way of trying to perform recon.
We will get into why I eventually came to see how powerful this tool really was but first lets just go over some basics on what it is.
Maltego in the simplest form is an information-gathering tool and a tool that will help you perform reconnaissance on your next target. By target I mean people, infrastructure, networks, servers, IP addresses and the list goes on and on. If there is information to find this tool can help you find it.
Maltego is basically a hub for a bunch of different scripts that help you perform different Footprinting actions called transforms. It then puts all that information together in a nice format that makes it easy for you to consume the information.
Maltego actually comes pre-installed on Kali Linux and if you don’t have it already you can install it rather quickly using a Kali Linux Virtual Box Setup (https://www.hackingloops.com/kali-linux-virtualbox-pentest-lab/).
So, enough talk lets take it for a test drive. To start Maltego in Kali Linux simply type “Maltego”.
maltegostart
You will see something that looks like the following graphic, and if you are booting for the first time it could take a couple of minutes:
maltegomodules
When it finally boots you can see the setup and basic look of Maltego:
maltegostartup
From this setup screen just follow the steps by clicking next, create a login for yourself and then registering. The setup will guide you through all of that rather easily.
Once you’ve logged into the servers using the login you just created, you will see that “Maltego public servers” is checked. Just leave this checked, as these are the servers we want to discover transforms from and click next.
maltegowelcome
You will then see the following launch page that will finally let us get started. Just leave Run a machine (NEW!!) checked and click finish.
maltegorun
Ok, so now that is done it starts to get really interesting because on the next screen as you can see below, we are actually able to choose the type of reconnaissance we want to do now on our target. We have several options but lets just do a quick overview of some of the more important ones:
Company Stalker
This option basically allows us to select a particular domain, from that it searches for all the email addresses it can find and from there it tries to find all the social media networks it can find.
Footprint L1
  • This is a basic footprint of a domain in its simplest form.
Footprint L2
  • Same as above just a little more involved and will take a little longer. We might get a bit more data than the most basic Footprint above.
Footprint L3
  • Same as the other two above except much more involved. This can take a ton of time to complete but might also net us much more information in the end.
Person – Email Address
  • You input an email address and it sees what it can find using that out on the web.
URL To Network And Domain Information
  • You input a URL and you get back network information.
startamachine
For this next exercise lets just do the basic Footprint of an organization for now. It will be the quickest and let us see how the basic functionality works. Select Footprint L1 and click next.
Lets do a Footprint on the company that created Maltego: www.paterva.com:
startamachine2
From there you just hit run and Maltego will automatically start Footprinting the domain for you. If you have ever done reconnaissance you know how amazing a tool like this is because it takes time to do the proper research on your target and generally speaking when conducting a pentest, the reconnaissance is the part that takes the longest.
reconnaissance
Just below our new graph it created, you might notice the Transform Output. This is output of the actual Footprint transform in action and gives us a look at what it is looking for. You might also notice the domain we typed in laid out in an easy to digest graph format. You also might notice if you zoom out of the graph a bit it will reveal some other entities besides the domain you typed in.
graphfull
Using the most basic Footprint starting with only the domain we were able to find the website, IP Address, Netblock and AS Number. Not a ton of information but much more than we had before and these pieces will help us find other crucial information on the treasure map that is our target.
So now that we know some basic functionality on how this works, lets try and use that to take our Footprinting further. You might have noticed in the graph that there looks to be several computers in a cluster with an IP Range below it. This is a netblock that the domain belongs to. So if we take a second to think about that, we could reasonably assume that there may be other systems on the same netblock that might be relevant to our initial target.
With that information we could simply right click the netblock and run the transform NetblocktoIPs:
transform
That then gets us what we were looking for and we have found other machines within that netblock that might be relevant:
netblock
Chances are that some of these machines might belong to www.paterva.com. From there we could then run new transforms on each of these machines to produce an even more detailed map of our target. You can now see how powerful this tool is as you have the ability to keep running these transforms until you find what you need.
To get started from scratch and create a completely new transform you can click the “create a new graph” icon in the top left hand corner. You can then just right click anywhere on the new graph and you will be able to choose a starting point once again:
startingpoint
You can also use the main menu option, which is the large circular button (top left) to create a new graph, open an older one or save the current one as well.
MaltegoButton
In the above tutorials we used default Footprinting transforms at the most basic levels for network intelligence gathering. There will be many other times where we need to be more specific in narrowing our search to one specific device, location or personal piece of information.
Lets say for this example that all we have is a mail server name and we need to use that as the starting point on our map because at this point it is all we have. We first need to find that particular item to place on our map. One way we can do that is by opening up the Palette menu box. You can get there by going to the Manage tab and then find the Palette options in the Windows section.
palette
We then can drag the MX Record item on to our graph. You will notice below that when you drag it over it uses the default MX Record of mail.paterva.com. We can change that though by double left clicking the item name and typing in the MX Record that we want to use.
MxRecord
From there as we did above we can use this one item to build out this great visual that paints a picture of our target in a way that is most easy for our brains to understand. We can even drag over more items from our Palette if we already have that information. Some examples are an IP Address, MX Record, Netblock, URL, Website, DNS Name, email address, phone number, document or even a location.
Overall Maltego is an amazing tool for research and there is good reason why security firms look for Pentesters to have experience with it. However, I must caution that you can never rely on one tool to do proper reconnaissance. This tool should be one of the many items in your toolset to help you paint a proper picture of your target. Not to mention tools don’t always get it right so make sure you perform your due diligence when conducting your next pentest.
Please feel free to test these different transforms with emails, other domains and learn.  However, never perform any active action against any network except with written consent of the owner.
Share:

Hashflare Review

Hashflare.io is an arm of the services delivered by the HashCoins Team of professional cryptocurrency miners.


HashCoins has been in existence since the beginning of the cryptocurrency era in 2013. The team is patronized by over 350000 individuals and companies who have seized the opportunity to multiply their money by investing it wisely.
With hashflare.io, individuals can participate in mining cryptocurrency without doing the work by themselves. This means they can earn cryptocurrencies without purchasing the needed hardware and electricity supply.

Overview of Hashflare.io

Nothing goes wrong when trying to open www.hashflare.io. If you like, you can do this ten times per minute since it is pretty fast with a decent internet access. This makes registration, deposits and withdrawals fast and secure. To ease language barrier and to ensure that their presence is well felt in every region, Hashflare has included not just English Language on its webpage. As a matter of fact, potential investors from Russia, Turkey, Italy, Spain, Portugal, Germany and some more countries can browse the site comfortably by reading the content in their native languages.
On the home page of the site is written the site’s main objective—to mine cryptocurrency. This is followed by what you should expect and the different clouds they offer. With everything being detailed, nobody can say that he or she made a mistake while trying to figure out a good investment plan.

Benefits of Hashflare.io

Free for all

There is no need to ask your friend in Europe to open an account for you on Hashflare since you can do it yourself no matter where you are from. As long as you are an adult and you have some amount to invest, Hashflare.io is just meant for you. There is no restriction to the time limit for investment since they have already declared they are an investment for life opportunity.

VISIT Hashflare.io

The Right Cloud for Everyone

There are different categories of investments on Hashflare to suit everyone’s spending capacity. You can buy one or more units of Scrypt Cloud Mining, SHA-256 Cloud Mining, Ethereum Cloud Mining or Dash Cloud Mining. 1 MH/S of DASH Cloud Mining costs $6 but your contract ends for one year. There is also no maintenance fee for this mining just as in Ethereum Cloud Mining, which also expires in one year.
The minimum hashrate in Ethereum is 100 KH/S and it costs only $2.90. The other two packages have life time contracts but they do require some maintenance fees which can vary depending on prevailing circumstances. Cloud mining on Hashrate.io is like purchasing shares in the stock market. The miners who have donated their money get their share of profits based on the amount they have put into the company.

Hashflare.io Instant Payouts

Hashflare works like a robot. They don’t waste time in paying their share holders at the end of their operations. Investors can collect their funds into their Bitcoin wallets or reinvest it for higher profits.

Conclusion

You can be a member of this company the next minute. All you have to do is to sign up at hashflare.io and send in some bitcoins for any of the four categories I already listed. Your profits start calculating the moment you successfully make a deposit.

VISIT Hashflare.io


Hashflare.io is an arm of the services delivered by the HashCoins Team of professional cryptocurrency miners. Bitcoin Cloud Mining, Hashflare.io Review
Share:

A Foolproof Method to Remotely Install a Spy Software

In many of my previous posts on email hacking, I had suggested the usage of SniperSpy (remote spy software) to hack an email or any other password. To remotely install the SniperSpy on the target computer, all you have to do is just send the remote install file to the target email address as an attachment. Once the target user (victim) runs the file it gets installed automatically.
But there is one small problem…


What if the victim refuses to run the attached file?

This is the common problem that many of my visitors face. To solve this problem, I have come up with a foolproof method to remotely install the Sniperspy (or any other remote spy software) with a very high success rate.
To make the victim run the attached file without any hesitation, here’s a small social engineering trick.
All you have to do is just send the file from an email address that the victim will trust, instead of sending it from your own email account. Here is how it can be done
1. If the target email address is on Yahoo, then you need to create a dummy Yahoo account as follows
  • While creating a new Yahoo account just select the first name as Yahoo Securityand last name as Team.
  • Choose an email ID something like notifications09@yahoo.com,alerts009@yahoo.com etc.
Once you sign up, attach the spy software and send it from this fake ID. Since it appears to have come from Yahoo Security Team the victim runs it without any hesitation.
2. If the target email address is on Gmail, follow these steps
  • Create a new account with Security as first name and Team as last name
  • Choose an email ID something like alerts009@gmail.com
  • Complete the sign up process and go to your account
  • Click on Settings (on the top right corner)
  • Select the accounts tab, and you’ll see the option Send mail as: Next to this click on edit info
  • A new popup window will appear. Under the option Name: click on the second radio button and type the name as Gmail Team.
  • Click on save changes
Now whenever you send an email from this account, it appears to have come fromGmail Team. The victim will trust any emails from Gmail Team and hence will run the attached file without any second thought.

Please follow these instructions carefully

You should not attach the Sniperspy along with your email. You should place only the download link for your SniperSpy file and ask the victim to download it. Here is a step-by-step instructions to do that.
1. Goto www.hotlinkfiles.com and register a free account.
2. After you login to your account, at the top you’ll see an option to “Upload”. Click on it.
3. Now you’ll get a browse option to upload your file.
4. Upload the yahooupdate.zip (or gmailupdate.zip) file to hotlinkfiles.com server. Please note that you should place the snipersy file in a .zip or .rar format and rename it asyahooupdate/gmailupdate before uploading it.
5. Once uploading is completed, you’ll see the option “Direct Link:” under Linking Codes. Click on the option “Just the direct URLs”.
6. Now you’ll see the direct downlink to your yahooupdate.zip/gmailupdate.zip file. Copy it.
7. Place this download link in the body of the email and ask the victim to download the file from this link.
Do not paste the download link as it is. Instead type as “Download Here” and link this text to the download URL.

How to compose the Foolproof email?

Once you create a dummy email account compose a new mail as follows.
NOTE: Text in red color are for your reference only. Do not include that in the actual email body.
Subject: Install the latest security update
————————————- Email Body ——————————————-
Dear Gmail/Yahoo user (or name of the victim)
This is a security alert from Gmail/Yahoo security team. We hereby notify you to install the latest security update (see the download link) as an additional safety for your account. We are pleased to release this latest security update to our subscribers to keep their email accounts safe from unauthorized access. It is highly recommended that you install this update as a part of your Yahoo/Gmail security. To install this security update please follow these instructions
1. Disable your existing antivirus/antispyware (if you have one) before you install this update. This is required to avoid any compatibility issues.
2. Download the update from the following link and unzip the downloaded file.
Download Here
3. Double click on the file to install it. The update gets installed automatically and will not display any window.
4. Now re-enable the antivirus/antispyware software.
Please be advised that we are sending this email only to a list of selected subscribes whose accounts are likely to have vulnerabilities.
thanks,
The Yahoo/Gmail security team
NOTE: This email is sent from an automated system. Hence do not reply to this email.
—————————————– End body ——————————————
Once you send an email to the victim as specified above, the victim will download and install it without any hesitation/suspicion. So what are you waiting for? Go getSniperSpy now!
DISCLAIMER: This Tutorial Is ONLY For Learning Purposes. AnyOne Who Will Use It In A Negative Sense Is Himself Responsible For Any Trouble.
Share:

How To Clean Video Game Consoles Hardware And Accessories


How To Clean Video Game Consoles Hardware And Accessories

Aside from lag, having to clean your gaming equipment is one of the worst things that can happen to a gamer. Seriously, who cleans their things, anyway? Gaming is for fun, not doing chores. But in those rare occasions when you decide that your console can't really take much more, then you have no choice but to clean it, especially as far as dust is concerned. Dust is the biggest enemy your gaming set-up can possibly have. It can not only make your hardware run worse than it usually does, but it can also damage it beyond repair. And in the light of the holidays and the oncoming Christmas celebrations, when I assume many people get the new generation of consoles as presents, I decided to do a guide on how to properly clean and maintain and clean your console hardware and accessories. This will not only increase the longevity of your console,but it will also ensure that it runs great for as long as possible. It's not going to be pleasant, let me tell you that much, but it's worth doing if you are a true enthusiast and plan utilizing your new (or old console) in the best way possible.

Unplug everything

This is possibly the most important step in the process. You need to unplug everything, otherwise you risk damaging the platform. Not only that, but you can also get hurt so it's a good idea to apply extra caution. After all, you are working with sensitive equipment. Carefully unplug everything that can be plugged and make sure you don't forget anything.

If some of the accessories aren't plugged (like your controllers or headset) and are powered by batteries, instead, remove the batteries. You want to discontinue all power supply to both the console and its components.

Cleaning the exterior

There are several things that you will need here in order to accomplish this fairly simple task. First of all, buying a microfiber towel would yield better results in the cleaning process, even though this part is optional. You can use any lint-free old rag you can get your hands on. You will need two of them – one for the processing and one for the drying out. Also purchase an electronics spray (the kind of spray you can use to clean all sorts of electronics, like laptops, consoles, monitors and more). Spray some of the solution on the cloth and wipe off all the surfaces of your hardware. Dry out with the other cloth immediately so you make sure that everything works well afterwards. Never spray directly on the surface of the console or any of the periphery. This may very well damage the devices so be careful.

Cleaning the interior

Cleaning the interior is a bit trickier. You should open the console because odds are you don't know what you're doing (otherwise why would you be reading this?) so you might damage it. Spraying compressed air into the air vents of your device would be enough to remove a large portion of the dust outside the console. This way you don't need to open it but you will still be able to clean most of it. Something to keep in mind is that compressed air comes out rather cold so you shouldn't be keeping the device too close to the source. Otherwise the air will condensate inside and damage the console.

Cleaning peripheral devices

Use a cotton swab and some rubbing alcohol to clean the peripheral devices such as controllers, microphones, headsets, etc. Just make sure to dry it out immediately. If you're not confident in your abilities to clean the console properly, seek the help of a specialist.
Share:

Mobile Hacking Part 1: Introduction and Device Building

Welcome back everyone! Today we start a brand new series about mobile hacking. This article will be an introduction to the concepts we’ll cover throughout the series, and a tutorial on how to build our own mobile hacking device. So, without further adieu, let’s get started!

Introduction and Overview

Smartphones are everywhere. Most people carry one with them majority of the time. Imagine if we could turn a cell phone into an advanced hacking machine, capable of launching targeted attacks. We’d be immensely powerful in the world of mobile devices. Being able to hack from a mobile devices comes with insanely valuable advantages. Throughout this series we’ll be learning to use these advantages in order to further enhance our hacking abilities.
Now that we have a premise for this material, we need to explain what we’ll be covering in this series. In order to avoid divulging too much information about the upcoming articles (no spoilers!), I’ll give a general overview instead of a specific timeline.
  • The advantages and disadvantages of mobile hacking
  • The different options in mobile hacking equipment and setups
    • Also including the pros and cons of each set
  • Mobile specific hacks
    • Hacks that can easily/only be performed on a mobile platform
  • Mobile v.s. Mobile
    • Hacking mobile devices with mobile devices
  • Additional (optional) mobile equipment for specialized attacks
It may not seem like a lot, but trust me, these topics will seriously help us grow and develop as hackers.

Building our First Mobile Hacking Device

Now that we have a basic overview of what we’ll cover throughout this series, we can move on to building our own hacking device! We’ll start by explaining the tech behind the device we’re going to make, and then we’ll get right into it.
It’s time to introduce a company that made the technology we’ll be using today, Pwnie Express. Pwnie Express makes a variety of hacking devices available for purchase. Among these devices is the Pwn Phone. Normally you’d have pay a little over $1000 for a Pwn Phone. But for those with enough ambition, the Pwnie Express maintains the AOPP (Android Open Pwn Project), which allows us to build our very own Pwn Phone! Just a heads up; the AOPP only supports a handful of devices, before continuing, I recommend you make sure your device is supported!
Now that we know where this technology is coming from, we can get building. We’ll be building our Pwn Phone out of a LG Nexus 5, running completely stock ware. So, let’s get started!

Step 1: Download Needed Files

In order to start making our pwn phone, we need to download a handful of files. Since we here at Hacking Loops care about you, I’ve made a simple BASH script to do all the downloading for us. We need to download this script, format it, and make it executable. Let’s do all that now:
downloading-download-script
Now that we have this download script, all we need to do is execute it and wait. These files are quite big, so you’ll need to have some patience. It will store all the downloaded files in a new directory named project. So, let’s execute this script and wait:
executing-download-script
Now that we have these files, we need to do some work with them before we continue.

Step 2: Unpack the Android Command Line Tools

In order to work with our Nexus, we need to use the Android SDK platform tools. In order to use these tools, we need to unzip the Android file we downloaded in the project directory:
unzipping-SDK-tools
Here we use the tar command in order to extract the Android SDK zip archive into a new directory name android-sdk-linux. Inside of this new directory is an install tool that we need to use in order to install the proper platform tools. Let’s move into this directory and use the update tool:
executing-google-install
By using these settings with this install tool, we can install just the platform tools, not any of the other software that would be installed by default. Once we execute this command, we will receive a LOT of output. Eventually we’ll be given a prompt asking if we accept, answer yes and we can continue:
finishing-install
Now that we’ve finished the install, a new directory can be found one directory up named platform-tools. We need to add this directory to our PATH so we can use the tools from anywhere, which will make our job way easier:
editing-PATH
Now that we’ve added this to our PATH, we need to do some work on our device before we can continue.

Step 3: Enable USB Debugging

Before we can continue, we need to enable USB debugging on our device so we can modify it from our Kali system. In order to enable USB debugging, we first go to ‘Settings’, and scroll all the way down to ‘About phone’:
about_phone_normal(1)
Inside of this option we see a large amount of information about our device. Near the bottom of the menu, we can see a tab labeled ‘Build Number’:
build_number(2)
If we keep tapping the build number option, we will unlock developer options for our device. Once it happens we will be given a notification:
dev_options_unlock(3)
Now that we’ve been given this notification, we can go back to the main settings menu and see a new option:
new_menu_ops(4)
Developer options allows us more power over our device, including the ability to enable USB debugging. Around the middle of the menu we can find the option to enable it. Once we do, we will see a prompt asking for us to confirm our decision:
allow_USB_debug(5)
There we go. Now that we have USB debugging enabled, we can continue.

Step 3: Unlock the Bootloader and Install TWRP Custom Recovery

In order to install the AOPP, we need to install it through a custom recovery. If we’re going to use a custom recovery, we ought to install one first! We’re going to be install the Team Win Recovery Project (TWRP for short). This will allow us to backup and install software on our device easily.
But, there’s a catch. In order to install TWRP, we need to unlock the bootloader.  This is incredibly easy so let’s just get it out of the way.  Inside of the compressed file that we setup earlier is a tool named fastboot. This tool allows us to interact with the device while it’s in the fastboot state. In order to access the fastboot menu, power down your device, then hold the power and volume down buttons at the same time until a menu with an open android appears.
Now that we have the fastboot menu open, we need to make sure our Kali system is recognizing the phone. We can tell fastboot to list all the devices current connected. Once we do that we’re going to use fastboot to unlock the bootloader so we can install TWRP. Let’s do these things now:
fastboot-list-and-unlock
Now that we have the bootloader unlocked, we can flash the TWRP recovery image to our device. We also use fastboot for this, and the process is rather simple. Let’s flash TWRP now:
flashing-TWRP

Now that we’ve installed a custom recovery, we can continue.

Step 4: Install the AOPP ROM

Now that we can use our custom recovery, we can install the AOPP. In order to boot into our recovery, we need to select the “Recovery” option from our fastboot menu on our device. You can scroll through the options by using the up and down volume buttons, and choose the selected option with the power button.
We should see the boot screen for TWRP, once it loads it should look something like this:

twrp menu
Now that we’re in TWRP, we need to do some wiping. To do this, we need to select the “Wipe” option, and select everything except Internal Storage and then swipe the bar at the bottom of the menu. After a few seconds, the wipe should be successful.
Now that we have wiped our system, we need to move the AOPP file over from our Kali system to our device. We can do this using a tool known as android debugging bridge (adb). We need to stay in recovery mode to use adb, so let’s use adb to see if the device is ready. If it is, we’ll push the zip file from our Kali over to the device:
push-AOPP-zip
Now that we’ve pushed the AOPP zip file to the device, we need to go back to the main TWRP menu. From here we select the “Install” option. Once we select this option we should see a space that lists file names. Among these names should be the AOPP that we pushed to the device. Select this file and follow the confirmation prompts to flash it to the device.
Alright, we’re almost done installing AOPP. There’s only one more thing we need to do. We need to push the  SuperSU zip file to the device, let’s get that out of the way:
pushing-SuperSU-zip
Now that we have all this in place, we should be able to reboot our device. Only one more step to go until have a fully functional pwn phone!

Step 5: Setup the Pwn Phone Environment

This final step is very easy. All we have to do is boot into our new system and follow the setup prompts. Once this is complete, we will be greeted with the pwn phone home screen. But you may notice something, we don’t have any tools yet!
In order to get the tools we need, we need to setup the Pwnix environment. There should be a notification at the top of the screen prompting us for to setup the environment:
env_setup
Once we select start, we will be prompted by SuperSU asking us if we want to allow the Pwnix setup root access. Once we grant it root permission, the setup will begin. Once the setup is complete, we’ll be prompted to restart to finish the install:
reboottoinstall
Once we restart we should have quite a few tools ready for use. But if we want to greatly expand the amount of tools on our device, we need to perform an update. We should have an update prompt at the top of the screen in the same place the setup prompt was. Once we perform this update we should have a fully fledged pwn phone!

There we have it! We successfully built our very own pwn phone. This device is incredibly powerful and I intend to prove it. In the next article we’ll be going deeper into the advantages of mobile hacking. I’ll see you there!
Share:

DISCLAIMER

The information provided on hottechtips.blogspot.com is to be used for educational purposes only. The website creator is in no way responsible for any misuse of the information provided. All of the information in this website is meant to help the reader develop a hacker defense attitude in order to prevent the attacks discussed. In no way should you use the information to cause any kind of damage directly or indirectly. The word “Hack” or “Hacking” on hottechtips.blogspot.com should be regarded as “Ethical Hack” or “Ethical hacking” respectively. You implement the information given at your own risk.