Welcome back my fellow hackers! In the past few articles we’ve been preparing to steal credentials from users on our local network, and today we’re going to be performing this attack. We’ll start by explaining the anatomy of the attack, and then we’ll perform the attack for ourselves. We’re going to be using a Man in the Middle Attack and a DNS spoofing attack, so you should read up on those attacks if you haven’t already. So, without further adieu, let’s get started!
The Anatomy of Credential Capturing
First, we’ll be discussing the basic anatomy of credential capturing. First, we’ll take a quick look at Man in the Middle attacks and DNS spoofing. Since we’ve already covered this we won’t be going too far into detail. If you need a refresher on these attacks, see the links above.
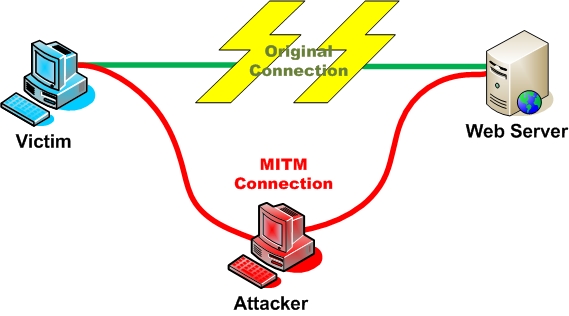
Man in the Middle attacks are very simple. An attacker simply places themselves between two parties so that all traffic flows through them. This way, the attacker can read all unencrypted traffic. The Man in the Middle in and of itself isn’t very powerful. But it opens the gateway to many other kinds of attacks. A MitM attack can be seen in the diagram below.

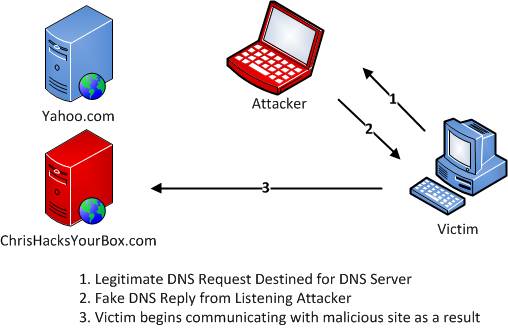
Next up, we have DNS spoofing, which we’ve also covered before. These attacks are also rather simple. The attacker (us), listens for DNS queries for a certain host, and spoofs the response to that request with whatever address they want. This way they can redirect the victim to whatever address they wish. DNS spoofing can be seen in the following diagram.

Alright, now that we’ve reiterated all of the attacks we’ve already done, it’s time to move on to the interesting stuff, stealing passwords! We’re going to be using something call the Social Engineering Toolkit, or SEToolkit (SET) for short. This toolkit is something that any hacker should be at least a little familiar with. This allows us to perform many different social engineering attacks. One of these social engineering attacks is the credential harvester, which will clone whatever website we give it and save a copy of it to our local machine. This lets us set up a server on our attacking machine and server the page just as the legitimate web server would. That’s about it for the anatomy of this attack, so let’s move on!
Performing the Attack
Step 1: Use the SEToolkit Credential Harvester Module
First, we’re going to clone the site with SEToolkit to get that out of the way. To start SET we just use the setoolkit command.
After a little while, and maybe a prompt or two, the SET should be ready to go. Once it boots up, we should see a menu that looks something like the screenshot below. We’re going to be choosing the first option, social engineering attacks.

Now we should be presented with another set of numbered options, we’re going to be selecting the second option, website attack vectors.

Guess what we have next! That’s right, more number menus! In this next menu we’ll be selecting the third option, the credential harvester attack method. Don’t worry about all these other options, we’ll get to them in due time.

Now all we have to do before putting in our attack details is select the site cloner, which is the second option.

Alright, now that we’re in the correct area of SET to enter our attack information, we need to get some information to enter! To start, we’re going to get our local IP address, which we’ll need to give to SET. We can get this by using the ifconfig command.

Now that we have our local IP address (10.0.0.16), we can hand it to SET in the first site cloner prompt.

Next, it will ask for the URL of the site we want to clone. This will clone the website and save it to our machine. We’ll be stealing an unsuspecting Twitter user’s password, so we’ll be cloning the Twitter website.

It should go on to clone the Twitter login page. Once its done cloning, it should ask us if we want to start the Apache web server process, go ahead and say yes to this prompt in order to avoid having an extra step.

You may need a little patience as this can take some time depending on your connection speed, but after some we should get confirmation that the site has been cloned into the Apache location and that the Apache service has been started.

Step 2: Start the Man in the Middle Attack
In order to perform DNS spoofing, we need to be able to see the victims traffic, so we’re going to use a man in the middle attack to place ourselves between the victim and default gateway. First, we need to find the address of the default gateway, which we can get using the route command.

We can see that the address of our gateway is 10.0.0.1 (remember to enable IP forwarding before continuing. You can enable it with this command: echo 0 > /proc/sys/net/ipv4/ip_forward). In order to make our job easier, we already have the address of our victim, 10.0.0.13. Now that we have this information, we can start the MitM with the arpspoof tool.
Now that the MitM is started, we can move on!
Step 3: Start the DNS Spoofing Attack
In order to perform our DNS spoofing attack we need to edit the file at /etc/hosts. This will tell the DNS spoofing tool what sites we want to spoof replies for. Since we’re pretending to be Twitter, we’re going to add the following line to the /etc/hosts file.

Now that we’ve added this line, the DNS spoofing tool will know that we want to spoof replies to responses for Twitter. Now we just have to start the dnsspoof tool and we’re good to go!

Step 4: Capture the Credentials
Now that we have all our attacks running, we can capture the credentials of our victim! From our victim PC, let’s point the browser at Twitter and try to log in.

Seems legit, huh? The biggest give-away for this attack is the message of using the mobile version of Twitter.
I’ve entered fake credentials for a fake user named victim_user and I’ve also entered a fake password. When we try and log in it will fail and we’ll be redirected to the real Twitter. It is at this point that we should cut all the attacks that way to we don’t raise any suspicion by playing with the victims traffic when we don’t need to.
Now that we’ve tricked our victim into logging in, let’s go to the Apache service files and see if anything new has shown up.

We can see that a new text file has appeared with the harvester name. This file should contain the captured credentials of the user, so let’s crack it open and find out!

There we have it! We were able to use MitM and DNS spoofing attacks in order to perform a credential harvesting attack! This is more than just a step-by-step on stealing passwords, it’s a proof of concept. By learning the in’s and out’s of these smaller attacks such as Man in the Middle and DNS spoofing, we can combine them together to make for a much more powerful attack. There’s a deeper message here, and that message is this: hacking is more than just technical skills. Hacking is just as much about creativity as it is about knowing your way around a computer, and today we’ve proven that.


0 comments:
Post a Comment