
Have you ever learned a new command, application, or tool, only to find that one week later you’re struggling to remember the exact syntax? Sure, Linux command line tools have help features, but they can be pretty cumbersome. That’s why cheat sheets exist, folks, and they can be a real life saver. Well, maybe a cheat sheet won’t save your life, but it can certainly save you oodles of time, headaches, frustration, and invalid commands.
That’s why I’ve compiled some of the most popular and frequently used penetration testing commands in three sections: general Linux usage, NMAP scanning, and Metasploit. It should be noted that this list isn’t comprehensive by any means, but will serve as a good reference for some of the most commonly used commands to help put you on the fast track to penetration testing in a Linux environment.
Even though experienced Linux users feel comfortable working with these commands on a nearly daily basis, there are some that slip through the cracks and become forgotten. Even some of the basic hotkeys and shortcuts, which can really help save a lot of time at the command prompt, are forgotten by experienced Linux users from time to time. Also, if you just want to initiate some network scans on your home network, I’ve included NMAP references as well.
Most of these commands will become internalized if you’ve had a chance to work with them for a few months. But every once and a while, it’s nice having a reference to rely on. So, let’s start the cheat sheet off with standard Linux BASH shell commands.
Linux BASH Shell Command Reference
BASH Shell Shortcuts and Shorthand:
Knowing your way around the BASH shell is what separates the seasoned Linux veterans from the wannabes and newbies. Though it may seem trivial at first, there are a lot of handy hotkeys that simply working from the shell. Some of them are just for convenience, some are practical, and some are functional.
The bottom line is you need to know how to save yourself the hassle of re-entering and extremely long command that is nearly identical to the last command you ran, and you had better darn well know how to terminate an active shell process. Use the following hotkeys within the Linux shell:
- ctrl + c – terminate the currently running command
- ctrl + r – search the current terminal session’s command history
- ctrl + a – go to the start of line (useful if you need to correct a typo at the beginning of a very long command)
- ctrl + e – go the the end of line
- ctrl + z – sleep program
- !! – reissues the last command that was run
- ![command] (i.e. !ping) – reissues the last command starting with the supplied parameters, which is the last ping command in this example
- Up arrow – search through the cached history of previously run commands
- Down arrow – sort through the history of used commands to the most recent command
- Tab – the tab key is useful for auto-completing file and directory names within the current working directory, which save you the trouble of having to type them out
Basic Shell Commands:
- mount – displays mounted media and file systems
- uptime – displays how long the system has been active
- clear – if there is too much information printed to the current terminal screen, you can wipe it all clean with the clear command
- date – displays the time and date that is configured within the operating system
- whoami – displays the current active user in the shell
- su root – prompts you for a root password to login and run commands with root privileges
- pwd – prints your current working directory, which is your current location in the file system
- ls – this is the list command, which prints the files and directories within your current working directory
- ls -l – this option is known as a “long listing,” and shows detailed information about the files and directories in your current working directory
- ls -la – this command will show you a long listing, and the -a option shows you all files; by default, hidden files that start with the “.” character are omitted
- cd [directory] – the cd command is useful for navigating the Linux files system; simply perform an ls command to see directories accessible in your current working directory
- cd ../ – this command will set you one level higher in the current working directory tree
- [command] | grep [parameters] (i.e. ls | grep myfile.txt) – piping command output to grep and supplying it with parameters will filter the output based on your criteria
- ps aux – displays a list of running processes; the output is long, so it’s best to pipe it to less, more, or search through it with a tool like grep
- kill [process_number] – kills a process based on it’s process ID identified with the ps auxcommand
Network Interface and IP Commands:
- ifconfig – the same as the ipconfig on Windows systems; this command will display interface information, such as MAC address, IPv4/IPv6 addresses, interface status, transmitted and received data, and so on
- ifconfig [interface] down (i.e. ifconfig eth0 down) – shuts down an interface, such as a wireless, Ethernet, or tunnel interface
- ifconfig [interface] up (i.e. ifconfig eth0 up) – enables an interface that has been shut down; taking an interface down and then up again (sometimes called bouncing an interface) can be a useful troubleshooting or reset procedure
- route – displays the current routing table, including the default route
Port and Service Commands:
In days of yore, most Linux systems used a tool called ipchains. However, these days, ipchains is obsolete, defunct, deprecated, and antiquated. Instead, you want to use the netstat command. Use the following commands to check and edit port settings on your Linux machine:
- netstat -l – shows ports that are in a listening state
- netstat -a – shows all ports (sometimes called sockets) that are in use
- netstat -u – shows all UDP connections and ports that are open
- netstat -t – shows all TCP connections and ports that are open
- netstat -a | grep [protocol] (i.e. netstat -a | grep http) – searchs all open connections and ports for any that contain the characters “http”
NMAP Command Reference
In this section we’re going to be going over all of the most common NMAP commands. I’ll start with a brief reference and explanation of each command, and then delve into greater details and explain the most important command options.
It’s also worth noting that NMAP commands are incredibly versatile. Not only is NMAP a widely used shell program on a variety of Linux distributions, but the data it generates can be “plugged in” to other programs as input. For instance, within the Metasploit framework (discussed in the next section), you can actually build a database of hosts and targets using NMAP scans.
The syntax for NMAP commands within Metasploit varies only slightly, and the options are the same. So what you learn in this section can be applied to other penetration testing tools. Use the following data as a reference for the NMAP help guide, which shows you most of the options and correct syntax:
Usage: nmap [Scan Type(s)] [Options] {target specification}
TARGET SPECIFICATION:
Can pass hostnames, IP addresses, networks, etc.
Ex: scanme.nmap.org, microsoft.com/24, 192.168.0.1; 10.0.0-255.1-254
-iL <inputfilename>: Input from list of hosts/networks
-iR <num hosts>: Choose random targets
–exclude <host1[,host2][,host3],…>: Exclude hosts/networks
–excludefile <exclude_file>: Exclude list from file
HOST DISCOVERY:
-sL: List Scan – simply list targets to scan
-sn: Ping Scan – disable port scan
-Pn: Treat all hosts as online — skip host discovery
-PS/PA/PU/PY[portlist]: TCP SYN/ACK, UDP or SCTP discovery to given ports
-PE/PP/PM: ICMP echo, timestamp, and netmask request discovery probes
-PO[protocol list]: IP Protocol Ping
-n/-R: Never do DNS resolution/Always resolve [default: sometimes]
–dns-servers <serv1[,serv2],…>: Specify custom DNS servers
–system-dns: Use OS’s DNS resolver
–traceroute: Trace hop path to each host
SCAN TECHNIQUES:
-sS/sT/sA/sW/sM: TCP SYN/Connect()/ACK/Window/Maimon scans
-sU: UDP Scan
-sN/sF/sX: TCP Null, FIN, and Xmas scans
–scanflags <flags>: Customize TCP scan flags
-sI <zombie host[:probeport]>: Idle scan
-sY/sZ: SCTP INIT/COOKIE-ECHO scans
-sO: IP protocol scan
-b <FTP relay host>: FTP bounce scan
PORT SPECIFICATION AND SCAN ORDER:
-p <port ranges>: Only scan specified ports
Ex: -p22; -p1-65535; -p U:53,111,137,T:21-25,80,139,8080,S:9
-F: Fast mode – Scan fewer ports than the default scan
-r: Scan ports consecutively – don’t randomize
–top-ports <number>: Scan <number> most common ports
–port-ratio <ratio>: Scan ports more common than <ratio>
SERVICE/VERSION DETECTION:
-sV: Probe open ports to determine service/version info
–version-intensity <level>: Set from 0 (light) to 9 (try all probes)
–version-light: Limit to most likely probes (intensity 2)
–version-all: Try every single probe (intensity 9)
–version-trace: Show detailed version scan activity (for debugging)
OS DETECTION:
-O: Enable OS detection
–osscan-limit: Limit OS detection to promising targets
–osscan-guess: Guess OS more aggressively
There are many more options in the NMAP syntax, but this is more than enough to get you started. Now, let’s take a look at some of the most common command references that will enable you to scan networks and hosts:
Host and Subnet Target Syntax:
- nmap [host] (i.e. nmap 10.10.10.1) – tells NMAP to target a single IP address
- nmap [domain] (i.e. nmap www.myserver.com) – tells NMAP to target a specific host, but that host needs to be resolvable with DNS
- nmap [range] (i.e. nmap 10.10.10.1-5) – specifies a range of IP addresses for NMAP to target
- nmap [subnet] (i.e. nmap 10.10.10.0/24) – tells NMAP to scan an entire subnet with a variable length subnet mask
- nmap -iL [import_host_list.txt] (i.e. nmap -iL myhostlist.txt) – allows you to import a list of hosts from other sources
Port Scanning Target Syntax:
- nmap -p 80 10.10.10.1 – scans a host to see if it is accepting connections on a specific port (port 80 in this case)
- nmap -p 80-100 10.10.10.1 – scans a host to see if it is accepting connections on a range of ports (port 80 in this case)
- nmap -F 10.10.10.1 – the -F options stands for “fast,” and will scan one hundrede of the most commonly used ports on a host
- nmap -p- 10.10.10.1 – scans all ports on a host, but is rather slow
Port Scanning Options Syntax:
- nmap -sT 10.10.10.1 – initiates a scan using TCP connections
- nmap -sU 10.10.10.1 – initiates a scan using UDP connections
- nmap -Pn 10.10.10.1 – initiates a port scan using selected ports, and omits the active port discovery process
- nmap -sS 10.10.10.1 – initiates a TCP SYN scan
Verbosity
I also wanted to add a section concerning the verbose option, which can be added to any of the previous commands. The problem with some NMAP scans is that they can seem to take forever, and the terminal won’t show you what’s happening behind the scenes by default. That can make waiting for your scan to finish nearly unbearable.
However, you can easily tell NMAP to print it’s completion rate with various tasks to the terminal. Not only is verbosity useful for keeping an eye on your NMAP scan and tracking its progress, but it’s also useful for seeing how different hosts and targets react to your scan. With verbosity enabled, you’ll be able to see error messages or hosts that didn’t reply to probes, which helps troubleshoot why the host isn’t responding.
The verbose option in NMAP syntax is simply -v. You can add the -v flag to almost any NMAP scan. For instance, if I wanted to track the progress of an NMAP scan on my local network, I would issue the following command:
- nmap -v -Pn 10.10.10.0/24
This command will run through a host and port scan for all 254 IP addresses on the 10.10.10.0/24 subnet. Furthermore, it will print information in the prompt regarding which address it is currently probing, giving you and accurate idea of how much more time is left in the total scan.
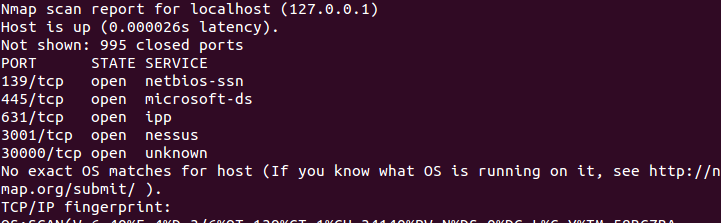
Identifying Hosts’ Operating System and Active Services
If you’re using NMAP from a Metasploit perspective, it would be highly useful to know what version, service pack, services, and operating system a host is using to probe for vulnerabilities. Fortunately, NMAP comes equipped with tools to scan a remote host’s operating system fingerprint and active services. Use the following commands:
- nmap -sV 10.10.10.1 – basic service scanning and detection
- nmap -sV –version-intensity [0-9] 10.10.10.1 – sometimes a probe won’t be able to identify a host’s operating system, so you can turn up the probing intensity with a value between 0 and 9. 9 is the most intense scan, which will try all available NMAP probes, but will also take longer
- nmap -sA 10.10.10.1 – NMAP will scan the specified host to identify its active services and operating system
NMAP Output
As mentioned previously, NMAP can be piped into various types of output format and imported into other applications. It’s possible to save the output in formats such as text files, XML, grep-readable formats for fast and easy searching, and a general “all format” type. Instead of simply printing output to a terminal or copying/pasting it into a text file, you can use the following commands to manipulate how the output is stored.
- Nmap -oX MyOutputFile.xml 10.10.10.1 – save output in an XML format
- Nmap -oG MyOutputFile.txt 10.10.10.1 – save the default output to a text file
- Nmap -oN MyOutputFile.txt 10.10.10.1 – save output in a GREP readable format (which can be accessed, searched, and filtered with the grep command)
- Nmap -oA MyOutputFile 10.10.10.1 – save output in all formats
Metasploit Command Reference
Core Metasploit Commands:
Metasploit is always changing, growing, and evolving. With each new vulnerability that’s discovered and added to the Metasploit framework, there are a myriad of new patches and operating systems as a response. As such, you need to know how to search through all of the exploits, vulnerabilities, and modules. The following is a cheat sheet of the core Metasploit commands:
- msfupdate – runs the automatic update function, and looks for any new exploits and vulnerabilities; note that this is run from the standard command line
- msfconsole – this command is how to enter the Metasploit environment and receive the msf >prompt in the terminal
- show exploits – displays all exploits in the terminal (should be piped to another command or filtered for better results)
- show payloads – prints all currently known payloads to the terminal (should be piped or searched with a command like grep)
- show auxiliary – displays all auxiliary modules that are contained in the Metasploit framework
- help – shows the main help page for Metasploit
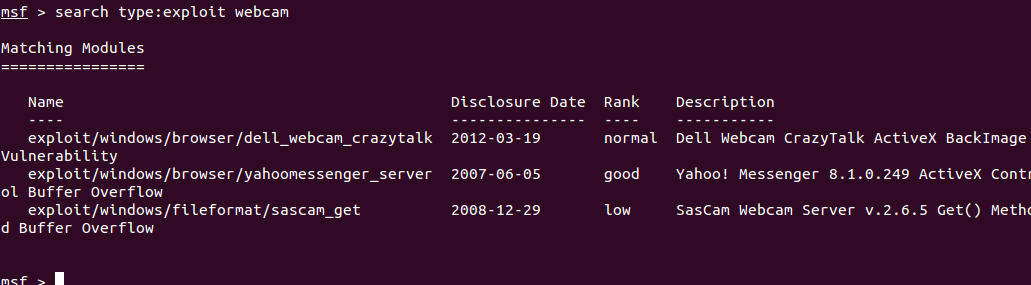
- search [name] – searches through the exploits and modules for any labeled with strings matching the supplied name
- info – displays information about a certain module or exploit
- use [name] – loads a module or exploit
- lhost [IP_address] – this should be set to your interface’s local IP address, especially if you’re currently on the same subnet or network as the target
- rhost [IP_address] – use this command to set the IP address(es) of the target(s) you wish to target with the exploit
- show options – displays all of a modules or exploits parameters that can be set; essentially a sub-help menu for an individual module that lists all of its commands
- show targets – displays which targets and systems can be targeted for a given module
- check – checks to see if the currently set target is vulnerable to the attack or exploit
Database Commands:
I had mentioned earlier that NMAP commands can be used in the Metasploit database. Metasploit comes with a lot of handy tools to build lists of hosts and run commands against those targets using NMAP commands as follows:
- db_nmap [nmap_command_syntax] – the basic syntax of NMAP commands within Metasploit
- db_nmap -v -Pn 10.10.10.0/24 – scans the 10.10.10.0/24 subnet with a basic port scan in verbose mode, and adds those hosts to the database
- db_export – exports your current database to a file and location of your choosing
- db_import – imports a database from another source
- db_status – displays the status of the database; if everything is in working order, this command should return a status of “connected
- hosts – prints a list of all the discovered hosts in the database, which could have been discovered from NMAP commands
- hosts -a [ip_address] – adds an IP address, range, or subnet to the hosts database list
- hosts -d [ip_address] – deletes an IP address, range, or subnet from the hosts database list
- hosts -u – prints all of the hosts that are known to be up
Cheat Sheet Conclusion
Lastly, I would like to point out that this cheat sheet shouldn’t serve as a shortcut to learning an entirely new operating system or penetration testing skills. If you think you can breeze through by reading a cheat sheet, think again. If you’ve never worked from the terminal before, you’re going to have a tough time using any commands in Linux.
If that’s the case for you, I’d recommend starting with some basing Linux tutorials, learning the Linux file system, and how to run basic shell commands. You may even want to dig into the course materials for the Comptia Linux+ exam. Having said that, this should be a solid reference for the most common commands (some of which you may have forgotten).


0 comments:
Post a Comment